International Journal of Innovative Research in Computer and Communication Engineering
ISSN ONLINE(2320-9801) PRINT (2320-9798)
ISSN ONLINE(2320-9801) PRINT (2320-9798)
| Maheshkumar P Department of ECE, EBET Group of Institutions, Kangayam-638 108, Tamilnadu, India |
| Related article at Pubmed, Scholar Google |
Visit for more related articles at International Journal of Innovative Research in Computer and Communication Engineering
The movements in the robots were battery powered, so one of the important issues in robot is the inherent limited battery power. Minimizing energy dissipation and maximizing battery lifetime are important issues in the design of robots so if the power exhausted would quit from the robot, and it overall affect the battery lifetime. Minimizing energy dissipation and maximizing network lifetime are important issues in the design of applications and protocols for sensor networks. To increase the lifetime of the battery on the design and construction of an optimization charging system for batteries by means of tracked solar panels. Thus, the implementation of a complete energy management system applied to a robotic exploration vehicle is put forward. The proposed system was tested on the robotic platform—an autonomous UNMANNED exploration vehicle specialized in recognition. The interest of this robotic system lies in the design concept, based on a smart host microcontroller. On this basis, our proposal makes a twofold significant contribution. On the one hand, it presents the construction of a solar tracking mechanism aimed at increasing the rover’s power regardless of its mobility. On the other hand, it proposes an alternative design of power system performance based on a pack of two batteries. The aim is completing the process of charging a battery independently while the other battery provides all the energy consumed by the robotic vehicle. A wireless sensor network consist of small devices, called sensor nodes that are equipped with sensors to monitor the physical and environmental conditions such as pressure, temperature, humidity, motion, speed etc. Wireless sensor network is a kind of self-organization wireless network which taking the data as center. The node in network is intensive, huge quantity and covering a large area. Aiming at the characters of wide range of area, large amount of information, and complexity of real-time transmission in rural district, this paper developed a wireless sensor network system based on zigbee technology for the transmission of the captured images. The human images are captured and moved to the owner of the company by the use of zigbee technology.
KEYWORDS |
| Li–Po battery, mechatronic system, photovoltaic (PV), robotic vehicle, solar tracker |
I. INTRODUCTION |
| SOLAR power systems in autonomous robotic vehicles have been often used for some years. A real example is the Sojourner rover, in which most of the supplied energy is generated by a reduced-size photovoltaic (PV) panel. However, in case of scarce to no solar light, the rover should minimize consumption, since its batteries in line could not be recharged when depleted. The use of rechargeable batteries in a space mission was used for the first time in the Mars Exploration Rovers. |
| The proposed robotic exploration vehicle (rover) has a dual solar panel system coupled to an assisted suspension mechanism. This prevents the manipulator arm mounted on the middle of the rover which would minimize solar panelgenerated power and allow it to dust solar panel surface. This rover would be developed to reach optimal energy consumption by a combination of a smart power management and an efficient locomotion system. On the other hand, the technological milestone is the implementation of solar-synchronous techniques to increase the amount of energy generated by solar panels. The Rover uses a control algorithm of maximum power point (MPP) aimed at maximizing system-supplied power for PV modules designed. This is a noteworthy project with main idea of the optimally selecting the solar energy or different power sources according to the operation conditions of a rover. |
| Solar-Powered Rover introduces the concept of smart host microcontroller (SHM) for intelligent power management applied to an exploration vehicle. The following sections present the control of the battery charging system by means of tracked solar panels, which is the main aim of this paper; the design of its mechanical structure, its electronic devices and the graphical user interface (GUI) are presented. |
| 1.1 Existing System |
| • In existing system ATMEGA8 microcontroller is used to control the rover. |
| • Solar panel is placed in a flat position and there is no rotation of such panel |
| • Low Battery charging level and there is no dual battery |
| • Analyze basic parameter only |
| 1.1.1 Drawbacks |
| • Parameters are not considered |
| • Motions are controlled through remotely |
| • Low battery lifetime |
| 1.2 Proposed System |
| The proposed system brings monitoring and controlling based on the video capture mode and with parameters such as humidity, temperature and light sensors. The tracking system is based on the light intensity and the voltage monitoring is for tracking the battery levels for efficient utilization of batteries. The real time videos are captured (using wireless camera and TV tuner card) and monitored for the further movement of the robot where its motions are also controlled through Zigbee wireless Transceiver remotely. The light sensors not only used for tracking the solar panels but also used for switching ON the night vision lights. |
| 1.2.1 Advantages of proposed system |
| • Low power consumption |
| • Effective charging |
| • Low cost to design |
| • Real time monitoring and controlling |
II. FUNCTIONAL BLOCKS |
| 2.1 Introduction |
| The Function Block Diagram (FBD) is a graphical language for programmable logic controller design that can describe the function between input variables and output variables. A function is described as a set of elementary blocks. Input and output variables are connected to blocks by connection lines. |
| Inputs and outputs of the blocks are wired together with connection lines, or links. Single lines may be used to connect two logical points of the diagram: |
| • An input variable and an input of a block |
| • An output of a block and an input of another block |
| • An output of a block and an output variable |
| The connection is oriented, meaning that the line carries associated data from the left end to the right end. The left and right ends of the connection line must be of the same type. Multiple right connections, also called divergence can be used to broadcast information from its left end to each of its right ends. All ends of the connection must be of the same type. |
| 2.2 Block Diagram |
| The aim is completing the process of charging a battery independently while the other battery provides all the energy consumed by the robotic vehicle. The monitoring and controlling system for robot with parameters like humidity, temperature conditions are monitored in wireless using Zigbee Transceiver. |
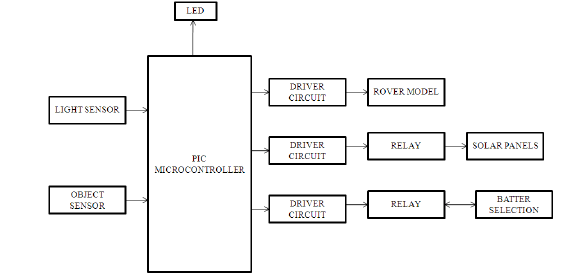 |
| Fig 2.1 Block Diagram |
| 2.2.1Hardware Explanation |
| The serial communication is provided by RS232 between Zigbee and desktop. The rover has four basic movements. They are forward, reverse, right turn and left turn. These movements are based on stepper motor rotation. The motor motors are steered by using driving circuits. The ON and OFF signals for the driving circuits are generated by suitable relays through microcontroller. The size of the rover occupied in the surface in 50cmx50cm. The weight of the rover is 10kg (approx). The power consumption of Zigbee transceiver (zicm357p2-1) is 3.3 V and the transmission range is upto 2 miles. |
| 2.2.2 Sensor Measurement Operation |
| This work poles the atmosphere temperature and humidity as the parameter of monitoring. The thermistor is the temperature sensitive resistor which is used to measure temperature. The resistance of the thermistor is varied with the temperature. This property is utilized to convert temperature to equivalent voltage for different values. The value is analog and is converted to digital so that the microcontroller can process the digital data. |
| Humidity sensor is another transducer which is used to measure the humidity level in the land. According to the humidity level it generates the DC voltage in the millivoltage. So there is need to amplify the signal. The signal is fed to an amplifier unit in which the incoming signal power level is amplified. Then the signal is given to analog to digital converter which converts the input analog signal to corresponding digital data. The converted digital data is given to microcontroller. |
| Along with batteries solar panels are used as an alternate energy source. The power generated by solar panel will be maximum when the sunlight falls normally perpendicular to the panels. According to the sunlight variation the panels are rotated. This task is accomplished with the help of actuators which steers the stepper motor to rotate the panels. These actuators are working with the input from the light dependent resistor (LDR) output. The LDR signal is analog and it is converted to digital and given to the microcontroller. The microcontroller in turn supplies suitable signal to active the actuators. |
| The power generated by the solar panel is 12 volt of the size 11cm X 11cm. All those process are looked after by microcontroller which handles all the sub devices connected across it. All this process is looked after by microcontroller which handles all the sub devices connected across it. It has flash type reprogrammable memory. It has some peripheral devices to play this project perform. It also provides sufficient power to inbuilt peripheral devices. The peripheral devices also activates as low power operation mode. |
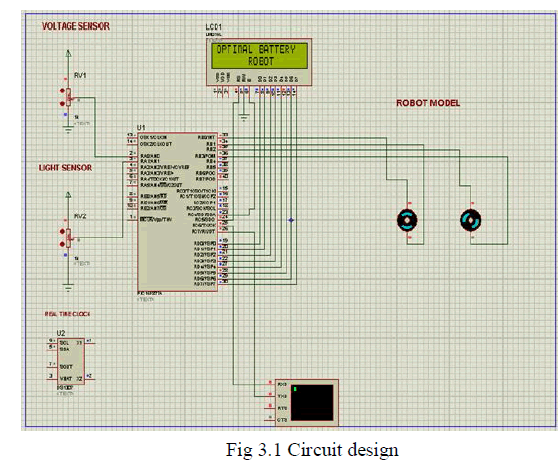
III. CIRCUIT DESIGN ANALYSIS |
| 3.1 Introduction |
| This chapter provides the details about the working of the rover and also the solar panel tracking buy the use of LDR sensor |
 |
| 3.2 Solar Cell Structure |
| The common solar cell that many of us have seen is called a photovoltaic solar cell. These are the type of cells found in solar-powered calculator and on satellites to generate electrical energy. These cells convert light energy directly into electrical energy. |
| These cells are made up of silicon and are made up of semiconductors. An atom of silicon has 14 electrons arranged in three general electron shells. The first two shells closest to the nucleus are full. The outer shell has four electrons and is only half-full. However, silicon will and can share electrons with its neighbors. In the case of crystalline silicon, there are other silicon atoms that will provide electrons for sharing. |
| However, pure crystalline silicon is a poor conductor as there are no extra electrons free to move about. Because of this a solar cell is constructed with silicon mixed with impurities; this is called doping the silicon. For example, phosphorus atoms could be mixed with the silicon. Phosphorus has five electrons in its outer shell. It still bonds with the silicon atoms but now there is an extra electron. |
| When energy is added to the crystal, this extra electron can break free of bond and this leaves a hole. Throughout the lattice, we have a series of extra electrons moving freely of their bonds; these electrons are called free carriers. |
| When silicon is doped with phosphorus, it is called an N-type crystal as it has extra electrons (N for negative). Part of a common photovoltaic cell is created as an N-type crystal. |
| However, it is also possible to make P-type (positive) silicon but doping it with a substance having three electrons instead of five. Instead of using phosphorus, born can be used. Boron has three valence or outer electrons. It, consequently, has more holes available for the free electrons created when the N-type silicon is energized. A hole can be thought of as an absence of an electron or a positive charge. The holes can appear to move just like free electrons. Both electrons and holes can be called charge carriers. |
| 3.3 IR Sensor |
| IR sensor for detect the objects. Infrared transmitter is one type of LED which emits infrared rays generally called as IR Transmitter. Similarly IR Receiver (photo diode) is used to receive the IR rays transmitted by the IR transmitter. One important point is both IR transmitter and receiver should be placed straight line to each other. |
| Out a beam of infrared light, detecting objects anywhere along the path of the beam. The linear ‘sensor’ is typically a few centimeters up to 4 centimeters in length. Rover rotates when the obstacle sensor senses any objects along its IR beam path |
| 3.3.1 IR sensor circuitInfrared transmitter is one type of LED which emits infrared rays generally called as IR Transmitter. Similarly IR Receiver is used to receive the IR rays transmitted by the IR transmitter. One important point is both IR transmitter and receiver should be placed straight line to each other. |
| The transmitted signal is given to IR transmitter whenever the signal is high, the IR transmitter LED is conducting it passes the IR rays to the receiver. The IR receiver is connected with comparator. The comparator is constructed with LM 741 operational amplifier. In the comparator IR circuit the reference voltage is given to inverting input terminal. The non inverting input terminal is connected IR receiver. When interrupt the IR rays between the IR transmitter and receiver, the IR receiver is not conducting. So the comparator non inverting input terminal voltage is higher than inverting input. Now the comparator output is in the range of +12V. This voltage is given to base of the transistor Q1. Hence the transistor is conducting. Here the transistor is act as switch so the collector and emitter will be closed. The output is taken from collector terminal. Now the output is zero. |
| When IR transmitter passes the rays to receiver, the IR receiver is conducting due to that non inverting input voltage is lower than inverting input. Now the comparator output is -12V so the transistor is cutoff region. The 5v is given to 40106 IC which is the inverter with buffer. The inverter output is given to microcontroller or PC. This IR circuit is mainly used to for counting application, intruder detector etc. |
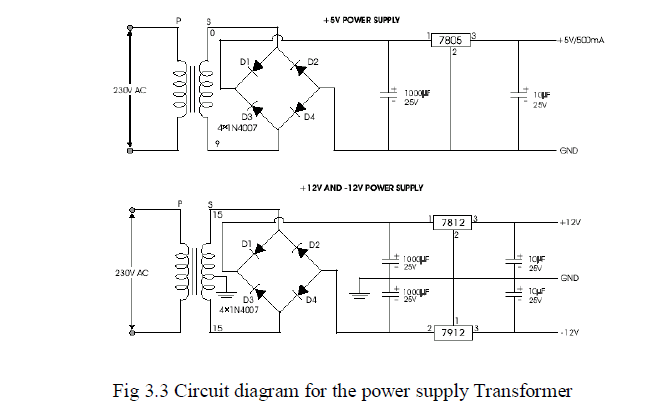
| 3.4 Power Supply |
| The transformer will step down the power supply voltage (0-230V) to (0-6V) level. Then the secondary of the potential transformer will be connected to the precision rectifier, which is constructed with the help of op–amp. The advantages of using precision rectifier are it will give peak voltage output as DC; rest of the circuits will give only RMS output. |
 |
| Bridge rectifier |
| When four diodes are connected as shown in figure, the circuit is called as bridge rectifier. The input to the circuit is applied to the diagonally opposite corners of the network, and the output is taken from the remaining two corners. Let us assume that the transformer is working properly and there is a positive potential, at point A and a negative potential at point B. The positive potential at point A will forward bias D3 and reverse bias D4. The negative potential at point B will forward bias D1 and reverse D2. At this time D3 and D1 are forward biased and will allow current flow to pass through them; D4 and D2 are reverse biased and will block current flow. The path for current flow is from point B through D1, up through RL, through D3, through the secondary of the transformer back to point B. This path is indicated by the solid arrows. Waveforms (1) and (2) can be observed across D1 and D3. |
| One-half cycle later the polarity across the secondary of the transformer reverse forward biasing D2 and D4 and reverse biasing D1 and D3. Current flow will now be from point A through D4, up through RL, through D2, through the secondary of T1, and back to point A. This path is indicated by the broken arrows. Waveforms (3) and (4) can be observed across D2 and D4. The current flow through RL is always in the same direction. In flowing through RL this current develops a voltage corresponding to that shown waveform (5). Since current flows through the load (RL) during both half cycles of the applied voltage, this bridge rectifier is a full-wave rectifier. |
| One advantage of a bridge rectifier over a conventional full-wave rectifier is that with a given transformer the bridge rectifier produces a voltage output that is nearly twice that of the conventional full-wave circuit. This may be shown by assigning values to some of the components shown in views A and B. Assume that the same transformer is used in both circuits. The peak voltage developed between points X and y is 1000 volts in both circuits. In the conventional full-wave circuit shown—in view A, the peak voltage from the center tap to either X or Y is 500 volts. Since only one diode can conduct at any instant, the maximum voltage that can be rectified at any instant is 500 volts. |
| The maximum voltage that appears across the load resistor is nearly-but never exceeds-500 v0lts, as result of the small voltage drop across the diode. In the bridge rectifier shown in view B, the maximum voltage that can be rectified is the full secondary voltage, which is 1000 volts. Therefore, the peak output voltage across the load resistor is nearly 1000 volts. With both circuits using the same transformer, the bridge rectifier circuit produces a higher output voltage than the conventional full-wave rectifier circuit. |
| IC voltage regulators |
| Voltage regulators comprise a class of widely used ics. Regulator IC units contain the circuitry for reference source, comparator amplifier, control device, and overload protection all in a single IC. IC units provide regulation of either a fixed positive voltage, a fixed negative voltage, or an adjustably set voltage. The regulators can be selected for operation with load currents from hundreds of milli amperes to tens of amperes, corresponding to power ratings from milli watts to tens of watts. |
| 3.5 Battery |
| An electric battery is a device consisting of one or more electrochemical cells that convert stored chemical energy into electrical energy. Each battery consists of a negative electrode material, a positive electrode material, an electrolyte that allows ions to move between the electrodes, and terminals that allow current to flow out of the battery to perform work. |
| Primary (single-use or "disposable") batteries are used once and discarded; the electrode materials are irrevesibly changed during discharge. Common examples are the alkaline battery used for flashlights and a multitude of portable devices. Secondary (rechargeable batteries) can be discharged and recharged multiple times; the original composition of the electrodes can be restored by reverse current. Examples include the lead-acid batteries used in vehicles and lithium ion batteries used for portable electronics. Batteries come in many shapes and sizes, from miniature cells used to power hearing aids and wristwatches to battery banks the size of rooms that provide standby power for telephone exchanges and computer data centers. |
| 3.6 Light Emitting Diode |
| A light-emitting diode (LED) is a semiconductor light source leds are used as indicator lamps in many devices and are increasingly used for other lighting. Appearing as practical electronic components in early leds emitted low-intensity red light, but modern versions are available across the visible, ultraviolet, and infrared wavelengths, with very high brightness. |
| 3.7 Stepper Motor |
| A stepper motor (or step motor) is a brushless DC electric motor that divides a full rotation into a number of equal steps. The motor's position can then be commanded to move and hold at one of these steps without any feedback sensor (an open-loop controller), as long as the motor is carefully sized to the application. |
| 3.7.2 Driver Circuit for Motor |
| This circuit is designed to control the motor in the forward and reverse direction. It consists of two relays named as relay1, relay2. The relay ON and OFF is controlled by the pair of switching transistors. A Relay is nothing but electromagnetic switching device which consists of three pins. They are Common, Normally close (NC) and normally open (NO). The common pin of two relay is connected to positive and negative terminal of motor through snubber circuit respectively. The relays are connected in the collector terminal of the transistors T2 and T4. |
| When high pulse signal is given to either base of the T1 or T3 transistors, the transistor is conducting and shorts the collector and emitter terminal and zero signals is given to base of the T2 or T4 transistor. So the relay is turned OFF state. |
| When low pulse is given to either base of transistor T1 or T3 transistor, the transistor is turned OFF. Now 12v is given to base of T2 or T4 transistor so the transistor is conducting and relay is turn ON. The NO and NC pins of two relays are interconnected so only one relay can be operated at a time. |
| The series combination of resistor and capacitor is called as snubber circuit. When the relay is turn ON and turn OFF continuously, the back EMF may fault the relays. So the back EMF is grounded through the snubber circuit. |
| ï When relay 1 is in the ON state and relay 2 is in the OFF state, the motor is running in the forward direction. |
| ï When relay 2 is in the ON state and relay 1 is in the OFF state, the motor is running in the reverse direction. |
| 3.8 Relay Driver Circuit |
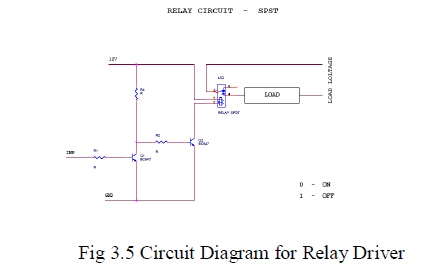 |
| A relay is an electrically operated switch. Current flowing through the coil of the relay creates a magnetic field which attracts a lever and changes the switch contacts. The coil current can be on or off so relays have two switch positions and they are double throw (changeover) switches. Relays allow one circuit to switch a second circuit which can be completely separate from the first. For example a low voltage battery circuit can use a relay to switch a 230V AC mains circuit. There is no electrical connection inside the relay between the two circuits; the link is magnetic and mechanical. |
| A relay is an electrically operated switch. Current flowing through the coil of the relay creates a magnetic field which attracts a lever and changes the switch contacts. The coil current can be on or off so relays have two switch positions and they are double throw (changeover) switches. Relays allow one circuit to switch a second circuit which can be completely separate from the first. For example a low voltage battery circuit can use a relay to switch a 230V AC mains circuit. There is no electrical connection inside the relay between the two circuits; the link is magnetic and mechanical. |
| Relays are usually SPDT or DPDT but they can have many more sets of switch contacts, for example relays with 4 sets of changeover contacts are readily available. Most relays are designed for PCB mounting but you can solder wires directly to the pins providing you take care to avoid melting the plastic case of the relay. The animated picture shows a working relay with its coil and switch contacts. You can see a lever on the left being attracted by magnetism when the coil is switched on. This lever moves the switch contacts. There is one set of contacts (SPDT) in the foreground and another behind them, making the relay DPDT. The relay's switch connections are usually labeled COM, NC and NO: |
| • COM = Common, always connect to this, it is the moving part of the switch. |
| • NC = Normally Closed, COM is connected to this when the relay coil is off. |
| • NO = Normally Open, COM is connected to this when the relay coil is on. |
IV. CONCLUSION |
| This paper has presented a smart energy management system applied to a robotic platform. An autonomous unmanned vehicle devoted to exploration tasks. The proposal includes the construction of a solar tracker mechanism based on mobile PV panels aimed at increasing system energy. Its main advantage is that the amount of generated power is independent from the rover’s mobility, since the proposed mechanism is capable of tracking maximum light intensity. Delivering the systems energy requirements while recharging the backup battery was made possible by implementing a dual system of selectors, monitors, and batteries. This strategy implies small solar panels to power a single battery at a time. A relatively good compromise between total weights, capacity available, and source-required power is reached. This solution does not attempt to achieve high charging times or great operating times but to prove a sustainable and commercially feasible solution applied to a robotic vehicle. In this sense, an SHM was designed for optimal charge regulation by means of an MPP tracking scheme based on the DPPM. Experimentation shows that the charging and discharging processes that require careful Li–Po cells became possible due to a fine SHM-implemented control algorithm. |
| Rover Design |
 |
References |
|