ISSN ONLINE(2319-8753)PRINT(2347-6710)
ISSN ONLINE(2319-8753)PRINT(2347-6710)
Ramandeep Singh1,Dr. Shruti Sharma2, Mr. Sandeep Sharma3
|
| Related article at Pubmed, Scholar Google |
Visit for more related articles at International Journal of Innovative Research in Science, Engineering and Technology
Non-destructive testing techniques are the preferred techniques in this new era of development and progress. Health monitoring of different mechanical and civil structures during its service is very important for the safety of human beings. Health monitoring of these structures using ultrasonic technique is an emerging field. It uses high frequency sound waves into the material to detect and locate defects, discontinuities in the material. This paper presents the use of pulse echo technique of ultrasonic to detect corrosion defect in mild steel plates and the behaviour of different frequencies at various levels of corrosion. For different damage types, most ideal modes and frequencies were selected for testing.
Keywords |
| Ultrasonic, Guided, Waves, Pulse Echo, Corrosion, Defect. |
INTRODUCTION |
| Damage detection has been an important area of concern in the design, operation, maintenance and repair of many military, industrial and civil structures and equipment’s involving plate structures, submerged in water or in air. Mild steel plates have a very wide application in industry. With the passage of time, the infrastructures involving plate assemblies deteriorate due to a variety of factors such as environmental degradation, fatigue, excessive loads, and simply due to long endurance combined with intensive usage. There is a urgent necessity of developing a reliable, noninvasive and in-situ non-destructive testing methodology for plate structures that can detect, locate and quantify damage. Current methods of non-destructive testing for structures include visual inspection, specialized techniques like radiography, magnetic particle testing, eddy current testing, acoustic emission, thermography etc. But these methods have specific applications and cannot be applied in every situation. Also these are specialized techniques which require skilled personnel for execution and further interpretation of results. Large size of infrastructural assemblies utilizing plate structures also limits the use of these methods. Current focus is to develop a damage monitoring methodology for plate structures which is non-invasive, in-situ and practically easy to implement. It is proposed in this work to use ultrasonic waves for the same. Sending ultrasonic waves through the mild steel plates for detection of damage may be very effective and assuring. Elastic waves propagating in a material alter at the location of the damage. Wave characteristics change when they interact with discontinuities and defects. Ultrasonic technique introduces high frequency sound waves into a test object to obtain information about the object without altering or damaging it in any way. This is one of the best non-destructive testing methods where ultrasonic wave is send into the structure to find the location and magnitude of the defect. Ultrasonic wave propagation varies with change in the medium in which the wave propagates. Ultrasonic signals generated by piezoelectric transducers are reflected back from cracks and time of flight of this reflected signal can lead to location of defect. Thisis called pulse echo method of testing. It uses a single probe acting as transmitter and receiver. Another commonly used ultrasonic technique of through transmission utilizes two transducers-one acting as transmitter and the other acting as receiver. The attenuation of the transmitted signal can lead to damage diagnosis in the subject structure. This regime of use of ultrasonic waves for damage detection is called bulk waves. The ultrasonic wave travels in the bulk media and is highly attenuative leading to scanning of small propagation distances. Hence, the focus has now shifted to using ultrasonic guided waves for health monitoring of structures. Guided Wavestravel along the surface and are guided by the geometry of the surface and hence, the name guided waves. Guided waves in plates are commonly referred to as Lamb Waves. In a thin plate (up to a few wavelengths thick), longitudinal wave are polarized in the direction perpendicular to the surface and Shear Waves polarized in vertical direction known as SV waves are formed and combined with L wave. These combined SV+L is known as Lamb Wave. In an isotropic plate, Lamb waves are either symmetric (Si) or anti symmetric (Ai), where i is order of mode. The symmetric modes associate with a compressional rarefaction expansion of the plate and anti-symmetric modes associated with a flexural propagation. Lamb wave have a dispersive nature and its phase and group velocities not only depend on the material characterization but also depend on the thickness, frequency and Lamb wave mode. The resulting refection and refraction at the interfaces produces many new signal packets. If angle of incidence and frequency is adjusted properly, the reflected and refracted energy within the plate will constructively interfere and form a Plate Wave.To use lamb waves for defect detection in plated structures, knowledge of the Lamb modes is must for detecting the defects at specific depth. But the plate waves are dispersive in nature. The phenomenon of the wave speed dependence on the frequency is called dispersion. Also in Lamb waves at a given frequency, multiple values of the wave speed are obtained. Different wave speeds correspond to different modes of the propagating Lamb wave. A particular Lamb wave mode can be obtained by keeping the sending and receiving transducers at a particular angle. The advantages of using guided waves over bulk waves for damage detection are variable mode selectionby using various combinations of different striking incident angles and frequencies, sensitivity to detect different type of flaws, propagation to long distances and the efficiency of guiding character that enables them to follow curvature and reach inaccessible locations for damage detection purposes. Due to these advantages guided waves have been used by various researchers to identify damages in various types of structures like reinforcing bars in concrete[1-5], pipes [6]), plates etc.[7-8], discusses the selection of the appropriate mode and frequency range for different inspection requirements and reviews the possible methods of excitation, response measurement and signal processing. Kunduet al.[9],described an investigation on the Lamb wave propagation through a two-layered glass plate with different interface conditions between the layers is carried out to study the effectiveness of Lamb waves in detecting defects at the interface as well as estimating the interface strength. Rose [10],described that guided waves improved efficiency, sensitivity and choice of mode to be used. Depending on the frequency, plate thickness and mode selected, the particle motion distribution through the thickness of the plate can be varied to increase the sensitivity to different defects. Kunduet al.[11], has studied the lamb wave propagation in large plates and its use in internal defect detection. Lamb wave modes which are most efficient for detecting different types of defects are identified. Roseet al.[12], carried out an experimental investigation to establish a technical concept for detection of defects in thin steel plates. The goal was to find the most efficient testing parameters, in context to relationship between excitation frequency of tone burst and various incident angles. Kunduet al.[13], has investigated the difficulties in detection of internal defects in mirror symmetric composite plates using lamb wave modes.Movafeghiet al.[14], stated that the biggest difficulty of lamb wave inspection is the dispersive nature of lamb wave and its multimode propagation and so need to signal processing as well as experienced operators Edalati et al.[15],studied the dispersion and displacement curves of ultrasonic lamb wave, propagated in Aluminium thin plates. Fromme et al.[16], designed a guided wave array consisting of a ring of 32 piezoelectric transducer elements, equally spaced on a diameter of 70 mm. Each transducer element consisted of a PZT disc (diameter 5 mm, thickness 2 mm) and a backing mass. The array was permanently bonded to the structure using conductive epoxy glue. The circular array design was introduced to achieve the same performance in all directions. In order to ascertain the sensitivity of the array monitoring measurements, the predicted and measured reflection amplitude of the various structural features and defects was compared. Literature of the last two decades shows increasing use of guided waves by various investigators for damage detection in various infrastructural assemblies. Aim of the present work is to effectively utilize ultrasonic guided waves for damage detection in plates in the form corrosion of varying extents. Specific guided wave modes were generated in the plate under investigation and pulse echo mode of testing was used for damage diagnosis in plates. The behaviour of various frequencies at various levels of corrosion was observed. |
II. EXPERIMENTAL INVESTIGATIONS |
A. CORROSION MECHANISM OF STEEL |
| Generally steel plates are passivated by an iron oxide film (Fe2O3) that protects the steel. However, the intrusion of chloride ions depassivates steel and is the most important factor in the corrosion of steel. Possible sources of chlorides include aggregates, mix water, admixture (accelerators),de-icing chemicals, seawater etc. the chloride content is significantly high in sea water. Potable water can contain small amount of chlorides (20-100 ppm). In the presence of oxygen, water, aggressive ions such as chlorides, steel bars are depassivated and corrosion is initiated. Corrosion is basically an electrochemical process where the anode and cathode are on the same steel bar. At the anode, iron atoms lose electrons to become iron ions (Fe++). At the cathode oxygen in the presence of water accepts electrons to form hydroxyl ion (OH¯) as shown in Figure 1. Anodic reaction: Fe→Fe2+ + 2e¯ (dissolution of Fe ions) (1) Cathodic reaction: 2e¯ + H2O + O2→ 2OH¯ (2) Both the anodic and cathodic reactions are necessary for the corrosion to occur and they need to take place simultaneously. The hydroxyl ions combine with the ferrous ions to form ferrous hydroxide from equation (1) and (2). Fe2+ + 2 OH¯ →Fe(OH)2 (3) In the presence of water and oxygen, the ferrous hydroxide is further oxidized to form Fe2O3. 4Fe(OH)2 + O2 + H2O →4Fe(OH)3 (4) (Ferric hydroxide) Fe(OH)3→Fe2O3.2H2O (5) (Hydrated ferric oxide- reddish brown rust) |
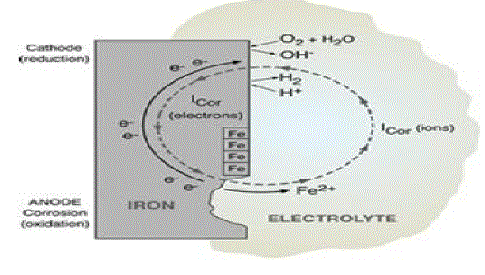 |
| Figure1: Mechanism of Corrosion |
| Hence, both anodic and cathodic reactions combine to get pitting in-situ due to corrosion (Eq 1) and formation of rust product (Eq 5). Purpose of this research is to pick up changes in deterioration in the plate dye to corrosion using guided waves. |
B. METHOD OF CORROSION EMPLOYED |
| There are many methods of accelerated corrosion. They can be listed as below: 1) Dipping in acid solution 2) By impressed current (electrolysis) corrosion. 3) Alternate drying and wetting 4) Placing in salt mist chamber. |
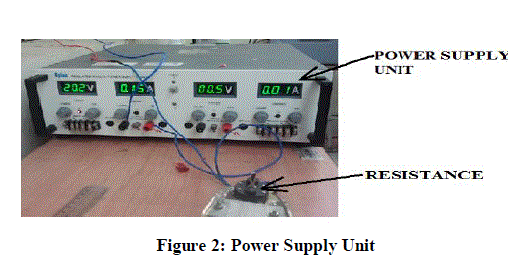
| Out of all the above methods impressed current (electrolysis) method was the fastest way to corrode the mild steel specimen. Speed of corrosion process can also be controlled by simply altering current and voltage settings from the power supply unit. i. Equipment Used Dual supply 32V power supply unit of Aplab was used. This is constant voltage supply unit. Both current and voltage can be controlled by a knob. Variable resistance of minimum resistance 80Ω was used. Copper plate was made as cathode and mild steel specimen as anode. Connections are made using copper wires (Figure 2). |
 |
ii. Electrolysis setup |
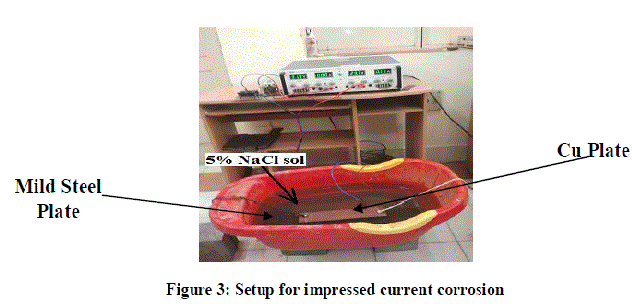
| Mild steel plate was placed in a plastic tank filled with 20 litres of 5% NaCl solution in water (Figure 5.4). NaCl solution acts as electrolyte. Copper plate was placed in the tank such that both these plates do not come in direct contact with each other i.e. it was kept hanging in the tub containing NaCl solution in water.Both these plates were connected to power supply unit using copper wires. Mild steel plate was kept as anode and copper as cathode. Resistance of 110 Ω was used. When the voltage was set at 30V, current was 0.27A. |
 |
C. Ultrasonic Experimental Setup and Specimen Details |
| The experimental setup consists of a typical Ultrasonic Testing (UT) system comprising of a DPR 300 Pulser/Receiver (PR) system which generates an ultrasonic spike pulse driven by the pulser/receiver, the compressional transducer generates ultrasonic pulse that propagates through the plate in the form of longitudinal waves. When there is an interface such as a crack, void or flaw in the wave path, part of the energy is reflected back from the interface and received by the same transmitting transducer. The reflected energy has been converted into an electrical signal which has been processed in a computer and digitized for display. This method of testing is called Pulse Echo Method(Fig. 4)Pulse- echo method has been used to detect the defect and also to ascertain the extent of damage. By knowing the speed of the stress wave, the distance to the reflecting interface can be determined. As the time of flight (TOF) in signal is taken from the V-t signal obtained from oscilloscope. Phase velocity of the mode of excitation is known from the dispersion curve. So the location from where the guided wave is reflected can be obtained as; |
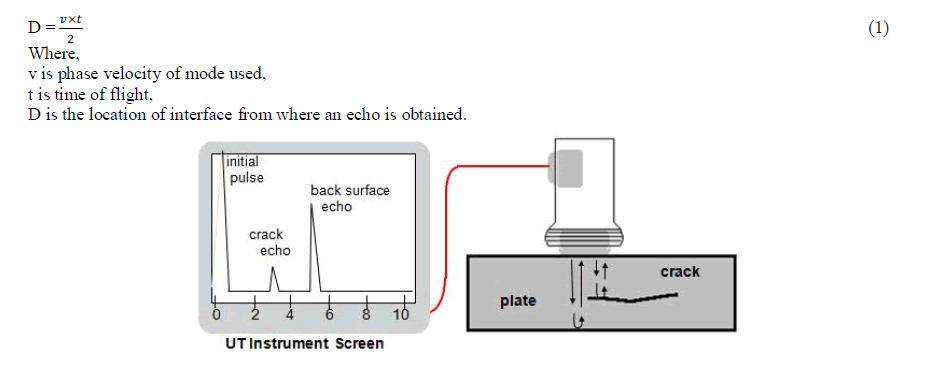 |
Fig. 4: PE Testing in Plate in Air |
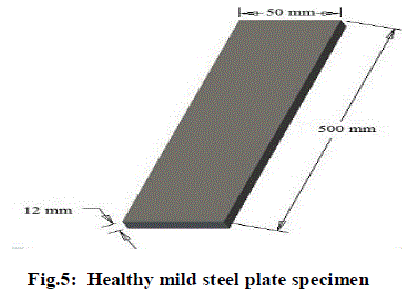
| For through transmission testing, two transducers are used-one for sending the ultrasonic signal and other for receiving the waveforms. Fall in amplitude of the transmitted signal Vis-a-Vis healthy plate helps to characterize the presence as well as damage extent. Ultrasonic transducers of Karl Deutsch Make and having longer wave form duration and a relatively narrow frequency bandwidth with centre frequency of 2MHz, 1MHz and 0.5MHz has been used. The specimenof mild steel plate having dimensions 500mm×50mm×12mm was fabricated (Fig. 5). |
 |
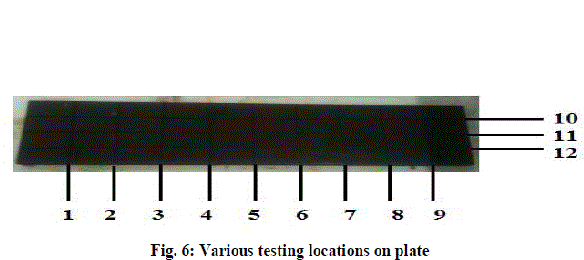
| Before starting the electrolysis process the weight of plate was 5351.5gm. The impressed current corrosion was done using above setup for 24 hours. It was found approximately 8gms of weight was lost after 24 hrs of corrosion. Then ultrasonic testing in air was done using 0.5MHz, 1MHz, and 2MHz in pulse echo mode after every 24 hours. Process was continued till 480 hrs (20 days) of impressed corrosion. Readings were taken on various locations as shown in Fig. 6 on the plate for the repeatability of the experiment. |
 |
a. Selection of Optimum Frequency and Mode for Ultrasonic Testing |
| Transducers with centre frequencies of 0.5 MHz, 1 MHz, and 2 MHz were used in the ultrasonic study for detection of notches in plates to develop a nondestructive damage detection strategy for plates. These transducers correspond to good signal fidelities. The transducers were driven by a Pulser/receiver system with maximum gain of 66 dB and maximum input voltage of 475V. An external PC and Digitizer card was used to capture the received signal and for further processing. The transducer was mounted in a holder and coupled using a industrial coupling gel. The excitation signal consisted of a negative spike pulse with pulse duration ranging from 10-70 ns.The results illustrate that different frequencies and modes have different dispersion characteristics with a trend toward higher frequencies having slower energy transport velocities. While testing in air it is difficult to separate different modes for excitation. A rough idea of mode obtained at a particular time can be obtained from dispersion curves which can be modelled in DISPERSE software [17] (Fig. 7). From the dispersion curves, the velocity of a particular mode for a given frequency of excitation canbe obtained. Knowing the distance of travel of the wave in |
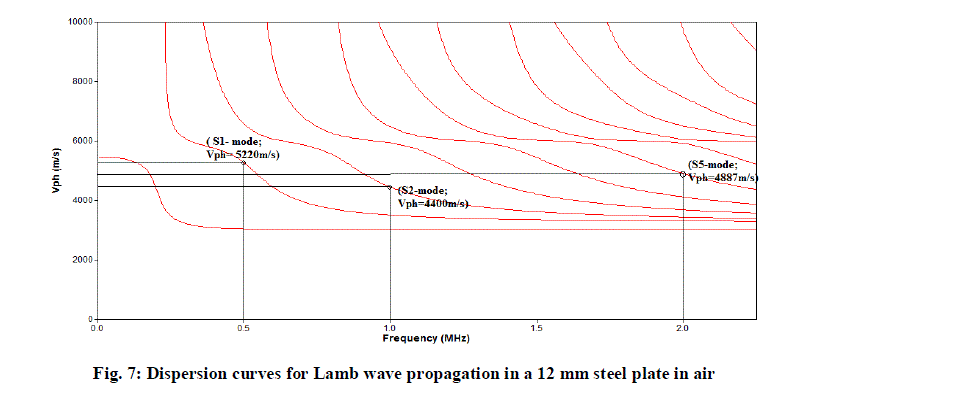 |
| the plate and time from the V-t signal obtained, experimental velocity at a particular point can be calculated and compared with theoretical velocities of different modes obtained from dispersion curve and roughly estimate which mode is obtained at a given point of interest. From the dispersion curve as shown in Fig.7, for 0.5MHz phase velocity (Vph) of 5220m/s corresponding to S1 mode was used in the plate. Similarly, for 1MHz,Vph of 4400m/s corresponding to S2mode was found to be suitable for excitation. At2MHz frequency of excitation, Vph of 4887m/s corresponding to S5 mode was suitable for excitation. |
III. RESULTS AND DISCUSSIONS |
 |
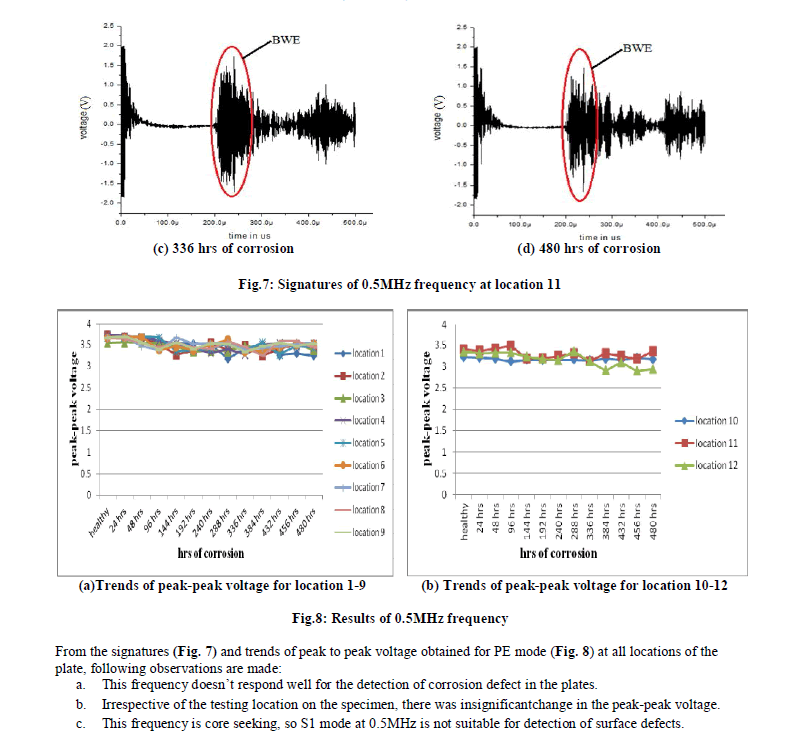 |
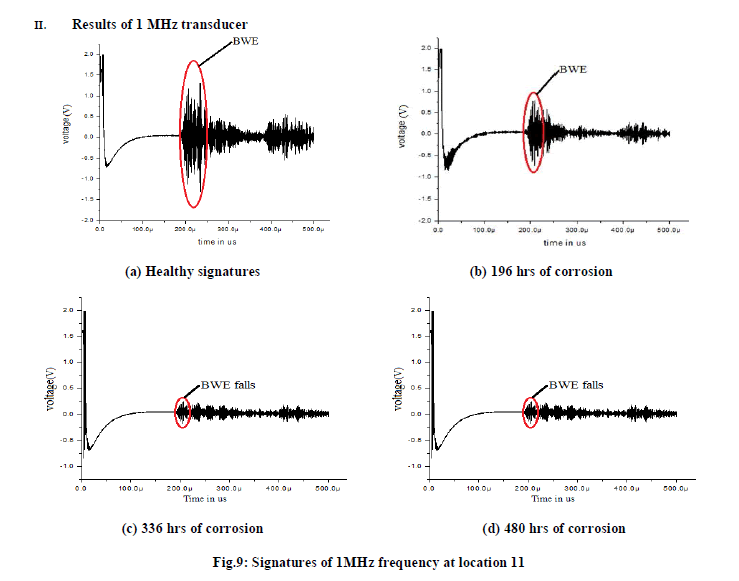 |
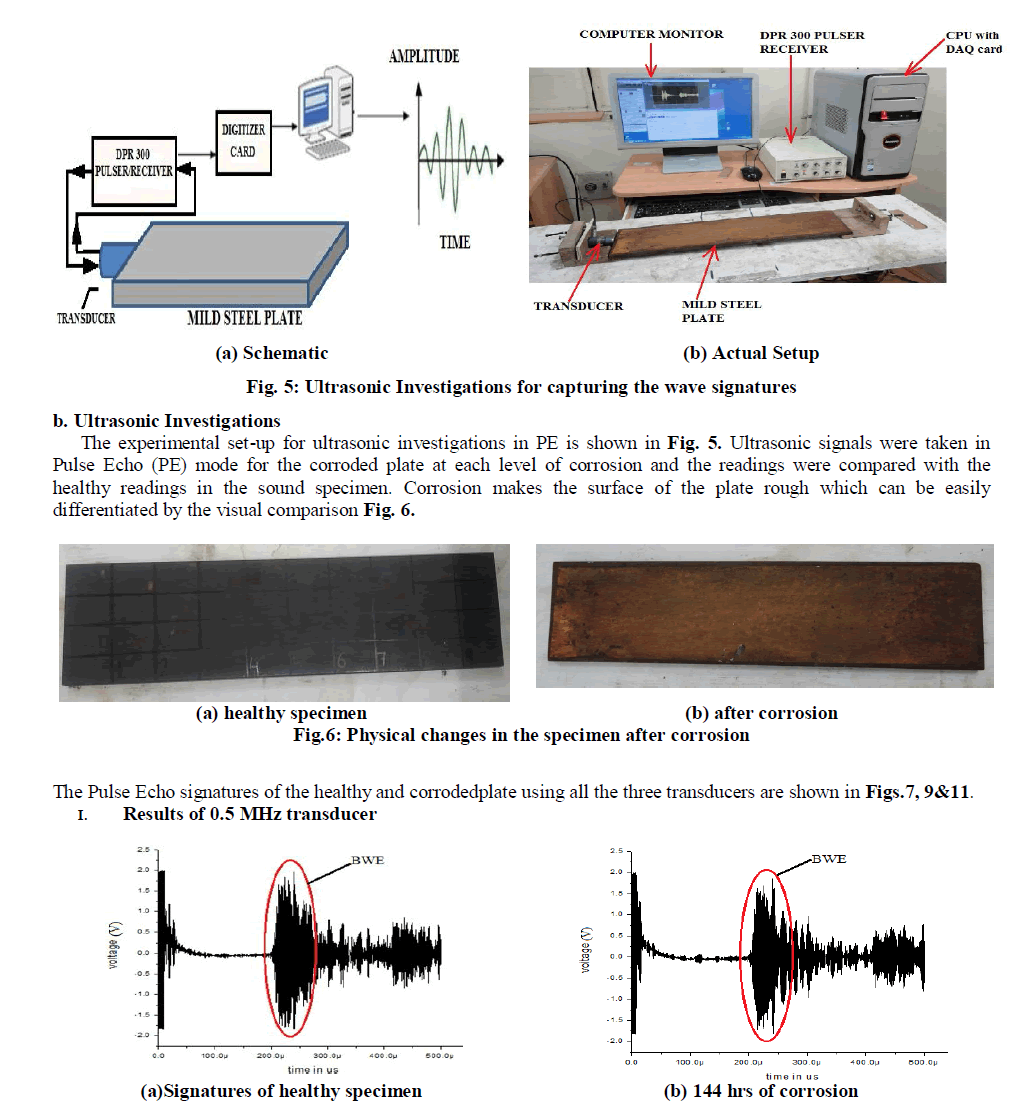
| From the signatures (Fig. 9) and trends of peak to peak voltage obtained for PE mode (Fig. 10) at all locations of the plate, following observations are made: a. There is significant drop in voltage amplitude as the corrosion progresses. So S2 mode at 1MHz is suitable for detection of this surface defect. b. From the trends it was clearly depicted that as the length of damaged specimen increases fall in peak-peak voltage amplitude becomes more prominent. This is due to deterioration or surface roughness, energy of the guided waves is eaten up due to multiple reflections from the discontinuities on the plate surface. c. The trends for the 12 testing locations ensure the repeatability of trends obtained. |
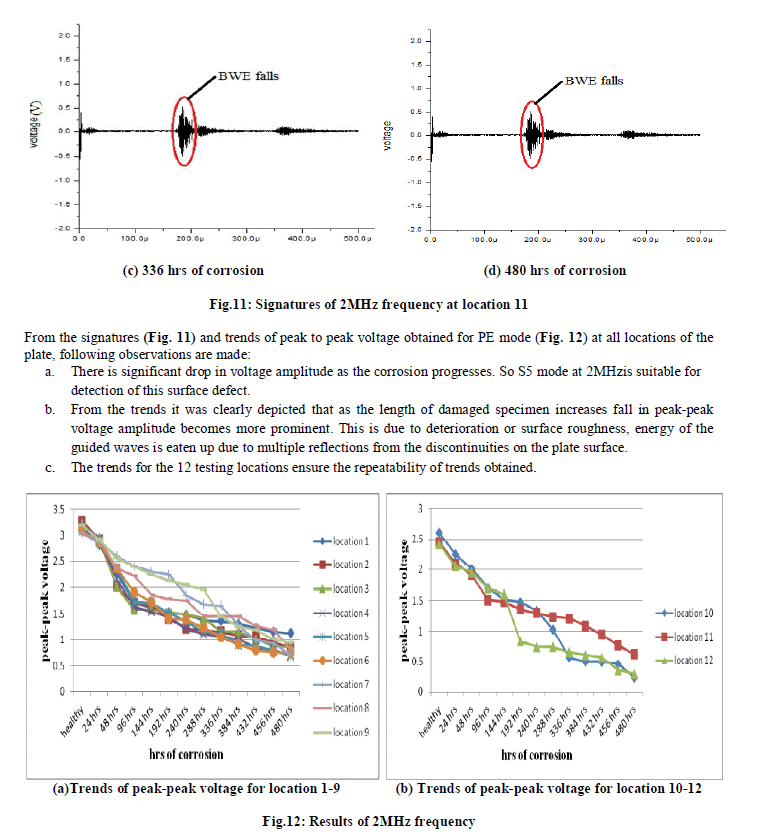
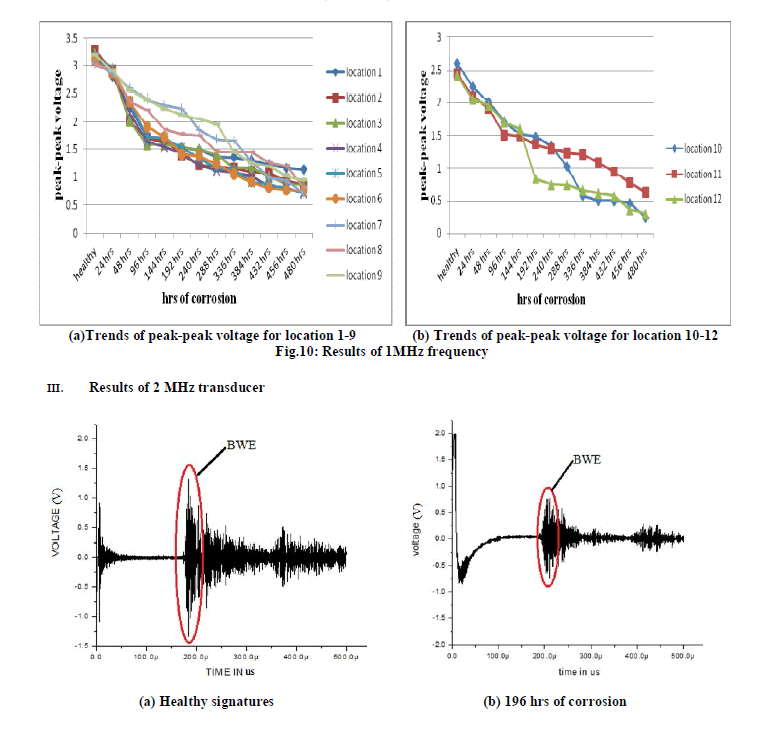 |
 |
IV. CONCLUSIONS |
| This paper describes a non-destructive damage monitoring technique utilizing ultrasonic guided waves with flaws in the form of corrosion. Also the suitability of various frequencies for detecting surface defects was determined while testing in air. The Ultrasonic Guided wave technique using Pulse Echo procedure successfully indicates the presence of damage. So this technique can be successfully utilized for corrosion detection for better results in comparison to visual inspection and other non destructive techniques. |