ISSN ONLINE(2319-8753)PRINT(2347-6710)
ISSN ONLINE(2319-8753)PRINT(2347-6710)
Rajendra M. Galagali1 and Dr. R. G. Tikotkar2
|
| Related article at Pubmed, Scholar Google |
Visit for more related articles at International Journal of Innovative Research in Science, Engineering and Technology
The influence of parameters like applied load, sliding speed and sliding distance on dry sliding wear rate of Ductile Iron (DI) / Austempered Ductile Iron (ADI) was investigated. The design of experiments (DOE) approach using Taguchi method was employed to analyze the wear behavior of Ductile Iron / Austempered Ductile Iron. Dry sliding wear tests were conducted using pin-on-disc wear testing machine. Signal-to-noise ratio and analysis of variance (ANOVA) were used to investigate the influence of parameters on the wear rate. It was determined that sliding distance was the most significant parameter influencing the wear rate of ADI followed by applied load and sliding speed. The mathematical model was obtained to determine the wear rate of DI / ADI. The confirmation tests were conducted to verify the experimental results foreseen from the mentioned correlations.
Keywords |
| Dry sliding wear, Austempered Ductile Iron, Taguchi method, Signal to noise ratio, Analysis of variance, Multiple linear regression model. |
INTRODUCTION |
| ADI is an acronym for Austempered Ductile Iron. It is a high strength material with superior ductility, toughness, hardness, fatigue and wear properties. It is 10% lighter than steel and can be manufactured at 20% less cost of steel. Because it is lighter and cheaper than steel, several steel parts (forgings, castings, assemblies) have been successfully replaced by ADI cast parts. While a majority of ADI application is in the automotive sector, other market distribution in railways, agriculture, mining and construction is quite significant. The excellent property combination of ADI has opened new horizons for cast iron to replace steel castings and forgings in many engineering applications with considerable cost benefits. New processing techniques have opened even more opportunities for this very prospective material to acquire better combinations of strength, ductility, toughness, wear resistance as well as machinability [1,2]. It is produced by austempering a ductile iron material to form a predominantly ausferritic matrix. Ausferrite consists of a combination of high carbon-stabilised austenite and acicular (needle-shaped) ferrite. It is this unique microstructure that is responsible for the remarkable combinations of strength, ductility, toughness and wear resistance that are exhibited by ADI. ADI refers to a family of heat-treated ductile iron. According to ASTM A897/897M-06 (2011), there are six different grades of ADI. The range of properties available for ADI is dependent on the choice of heat treatment parameters which will, in turn, determine the microstructural scale of the ausferrite as well as the relative amounts of austenite and ferrite within the ausferrite. [3]. Austempered ductile iron is produced by casting and heat treatment of common cast iron. Its microstructure is formed during casting, when special methods of metallurgical inoculation of molten metal ensure the formation of graphite in the form of nodules with a diameter of tens of micrometers, while the subsequent heat treatment shapes the matrix and changes it into a mixture of lamellar ferrite and austenite [4]. Austempered Ductile Iron is ferrous, cast material with a high strength to weight ratio and good dynamic properties. The austempering process is a high performance, isothermal heat treating process that imparts superior properties to ferrous materials. It was developed in the 1930’s and, although in wide use, is familiar to only a fraction of the design community. Ductile iron or Spheroidal Graphite iron was developed in the 1940’s. Ductile iron with its unique, spheroidal graphite morphology produces an iron that has tensile and impact properties sufficient for products as varied as brake calipers, pump impellers and steering knuckles. The application of the austempering process to ductile iron produces a material called Austempered Ductile Iron (ADI) that has strength to weight ratio that exceeds aluminium. ADI was commercialized beginning in the 1970’s and has seen significant growth in the decades following [5]. |
| U. Ritha Kumari et al., [6] studied the influence of austempering temperature on the wear behaviour of austempered ductile iron. At high austempering temperature large amounts of austenite was instrumental in improving the wear resistance through formation of deformation induced martensite. A.S.M.A. Haseeb et al., [7] compared the tribological behaviour of ductile iron heat-treated by quenching, tempering, and austempering to an identical matrix hardness of 445 BHN. Austempered ductile iron exhibited a better wear resistance than quenched and tempered ductile iron, although both have an identical chemical composition and matrix hardness. Uma Batra et al., [8] investigated to examine the influence of structural and mechanical properties on wear behavior of austempered ductile iron (ADI). ADI developed at higher austempering temperature has large amounts of austenite, which contribute toward improvement in the wear resistance through stress-induced martensitic transformation, and strain hardening of austenite. Amar Kumar Das et al., [9] carried out austempering for three different grades of ductile iron and studied variation in mechanical properties. With increasing austempering time, hardness, tensile strength and elongation are increasing but with increasing austempering temperature hardness and tensile strength are decreasing and elongation increasing. Austempered ductile iron with alloying element (Cu or Ni) has shown some improved mechanical properties such that: higher strength, hardness and lower elongation, than the unalloyed austempered ductile iron. Y. S. Lerner et al., [10] reviewed Austempered Ductile Iron as an alternative to steels, alloyed and white irons, bronzes, and other competitive materials. In the wear study quenched DI with a fully martensitic matrix slightly outperformed ADI. H. B. Bhaskar et al., [11] studied the influence of wear parameters like sliding speed, applied load and sliding distance on the dry sliding wear of aluminium metal matrix composites. The design of experiment approach was employed to acquire data in controlled way using Taguchi method. An orthogonal array, signal-to-noise ratio and analysis of variance were employed to investigate the wear behavior of aluminium and its composite. The mathematical model was obtained to determine the wear rate of the aluminium and its composite. The confirmation tests were conducted to verify the experimental results. Wear is one of the most commonly encountered industrial problems. Wear is defined as progressive loss of material from a surface as a result of relative motion between the surface and another. Wear contributes to the diminished usefulness of an item through changes in dimension, appearance or structural integrity [12]. |
MATERIALS AND METHODS |
| Material |
| Austempered ductile iron is used in the present experimental investigation. The chemical composition of ductile iron from which ADI is produced is shown in Table 1. |
 |
| Preparation of the material |
| Ductile iron castings were produced in a metal casting foundry using 500kg medium frequency induction furnace. Pig iron, mild steel, S. G. iron and return risers were used as the charge materials. The melt from the furnace was poured into the shell mould at 1420ºC to cast the sample test bar and is shown in figure 1. The samples for the experimental work were then machined to the required size of ÃÂ10mm and 30 mm length as shown in figure 2. |
 |
| Experimental set up and procedure |
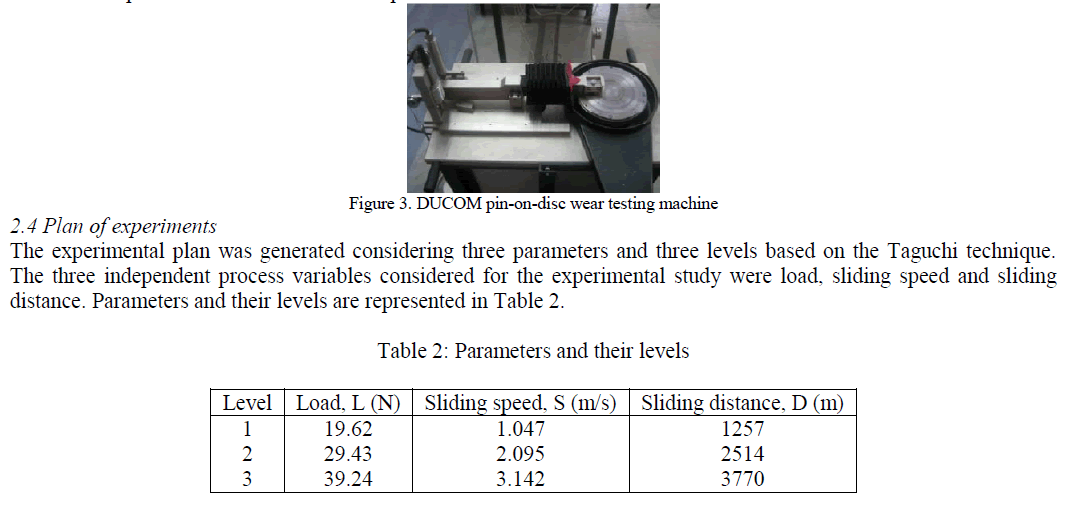
| DUCOM pin-on-disc wear testing machine (Figure 3) was used to evaluate the dry sliding wear characteristics of the austempered ductile iron. The dry sliding wear tests were conducted as per ASTM G99-95a standards. The pin was cleaned with acetone and its initial mass was measured using a digital weigh scale with least count 0.0001g. The pin was then held pressed against the rotating EN-32 steel disc (counterface) with a hardness of 65 HRC during the test. The tests were conducted as per the run order generated by Taguchi method. At the end of each test, the pin was again cleaned with acetone and its final mass was measured. The difference between the initial and final mass of the pin gave the mass loss due to sliding wear. The volume loss due to wear was calculated by the use of corresponding density values of the pin. The wear rate of the ADI pins was then calculated. |
 |
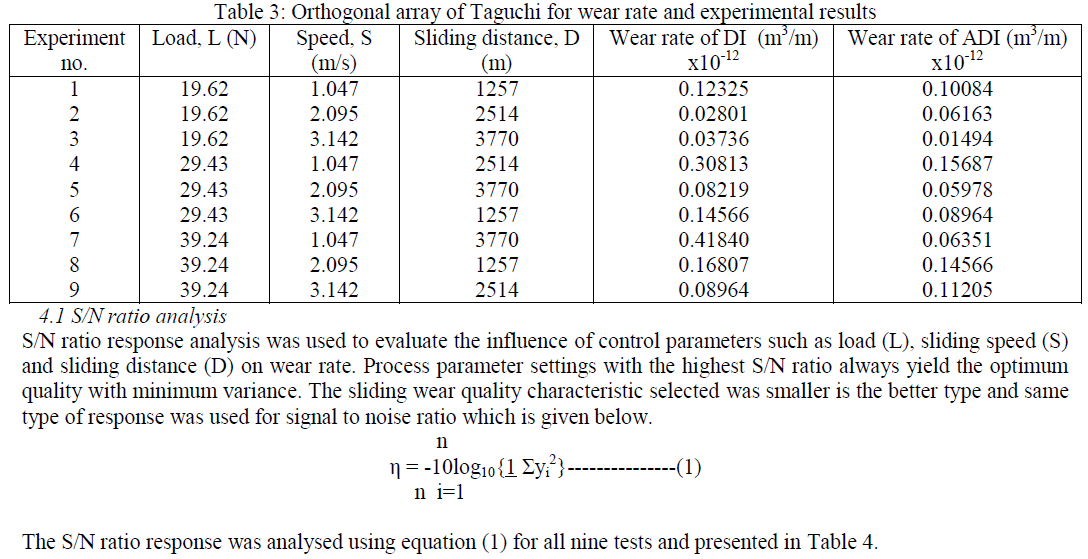
| In the present investigation an L9 orthogonal array was selected, which has 9 rows and three columns. The selection of the orthogonal array is based on the condition that the degrees of freedom for the orthogonal array should be greater than or equal to, the sum of the variables [13]. The selection of orthogonal array depends on number of factors and their interactions, number of levels for the factors, the desired experimental resolution or cost limitations. The response variable studied was wear rate. The experiments were conducted based on the run order generated by Taguchi model and the results were obtained. The analysis of the experimental data was carried out using MINITAB 15 software, specially designed for DOE applications. |
TAGUCHI METHOD |
| Essentially, traditional experimental design procedures are too complicated and not easy to use. A large number of experimental works have to be carried out when the number of process parameters increase. To solve this problem, the Design of Experiments (DOE) approach using Taguchi technique has been successfully used by researchers in the study of wear behavior of tribological materials. Taguchi method is a powerful tool for the design of high quality systems [13, 14]. Taguchi method uses a special design of orthogonal arrays to study the entire parameter space with only a small number of experiments. The Taguchi approach to experimentation provides an orderly way to collect data and to analyze the effects of parameters over some specific response. The method combines experimental and analytical concepts to determine the parameter with the strongest influence on the resulting response for a significant improvement in the overall performance. The plan of experiments is generated in Taguchi method by the use of standard orthogonal arrays. The experimental results are then analyzed by using analysis of mean and analysis of variance (ANOVA) of the influencing factors [15, 16]. |
| The steps applied for Taguchi optimization in this experimental study are as follows. [17] |
| • Select noise and control factors |
| • Select Taguchi orthogonal array |
| • Conduct Experiments |
| • Wear rate measurement |
| • Analyze results (Signal-to-noise ratio) |
| • Predict optimum performance |
| • Confirmation experiment |
RESULTS AND DISCUSSION |
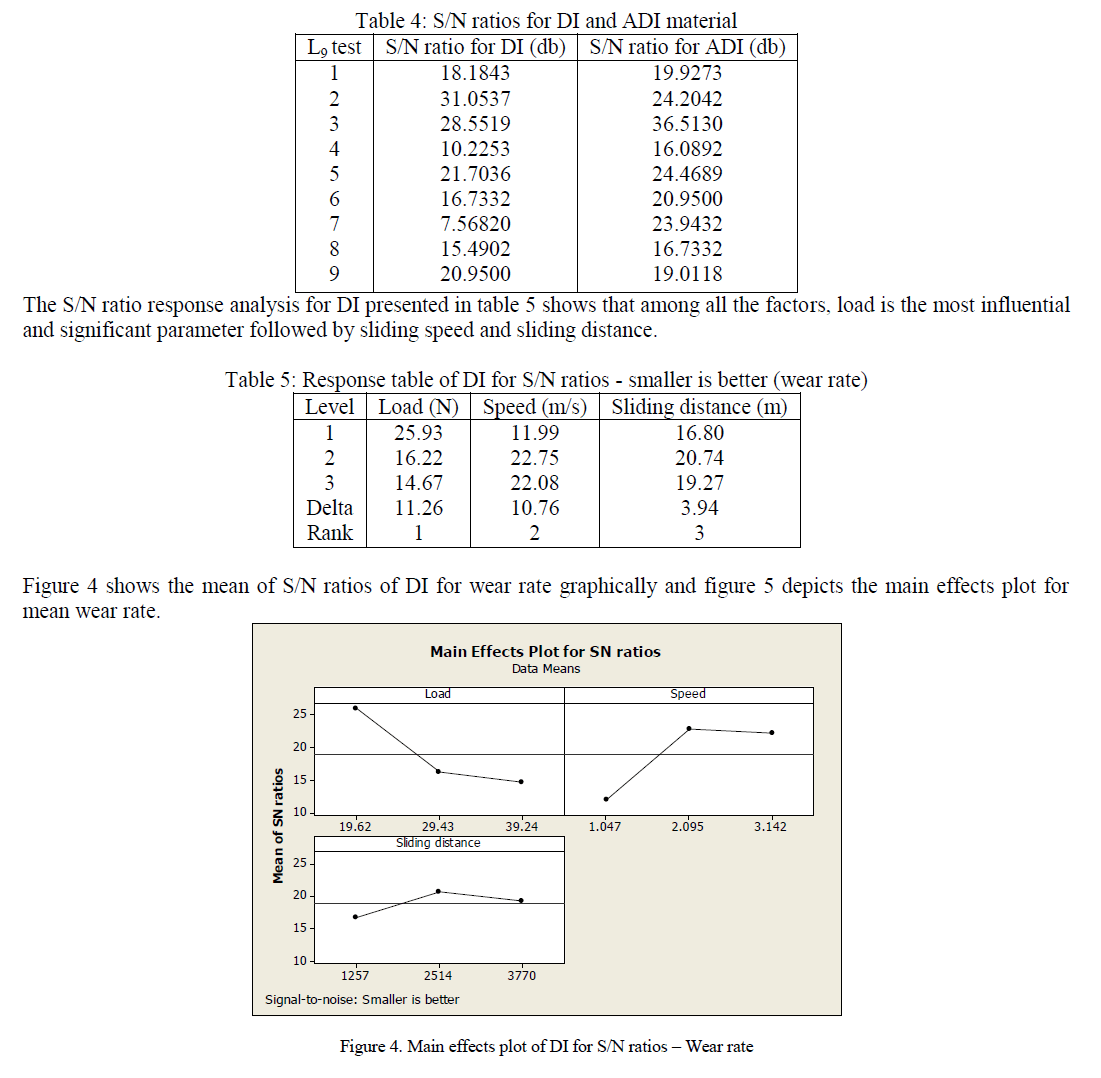
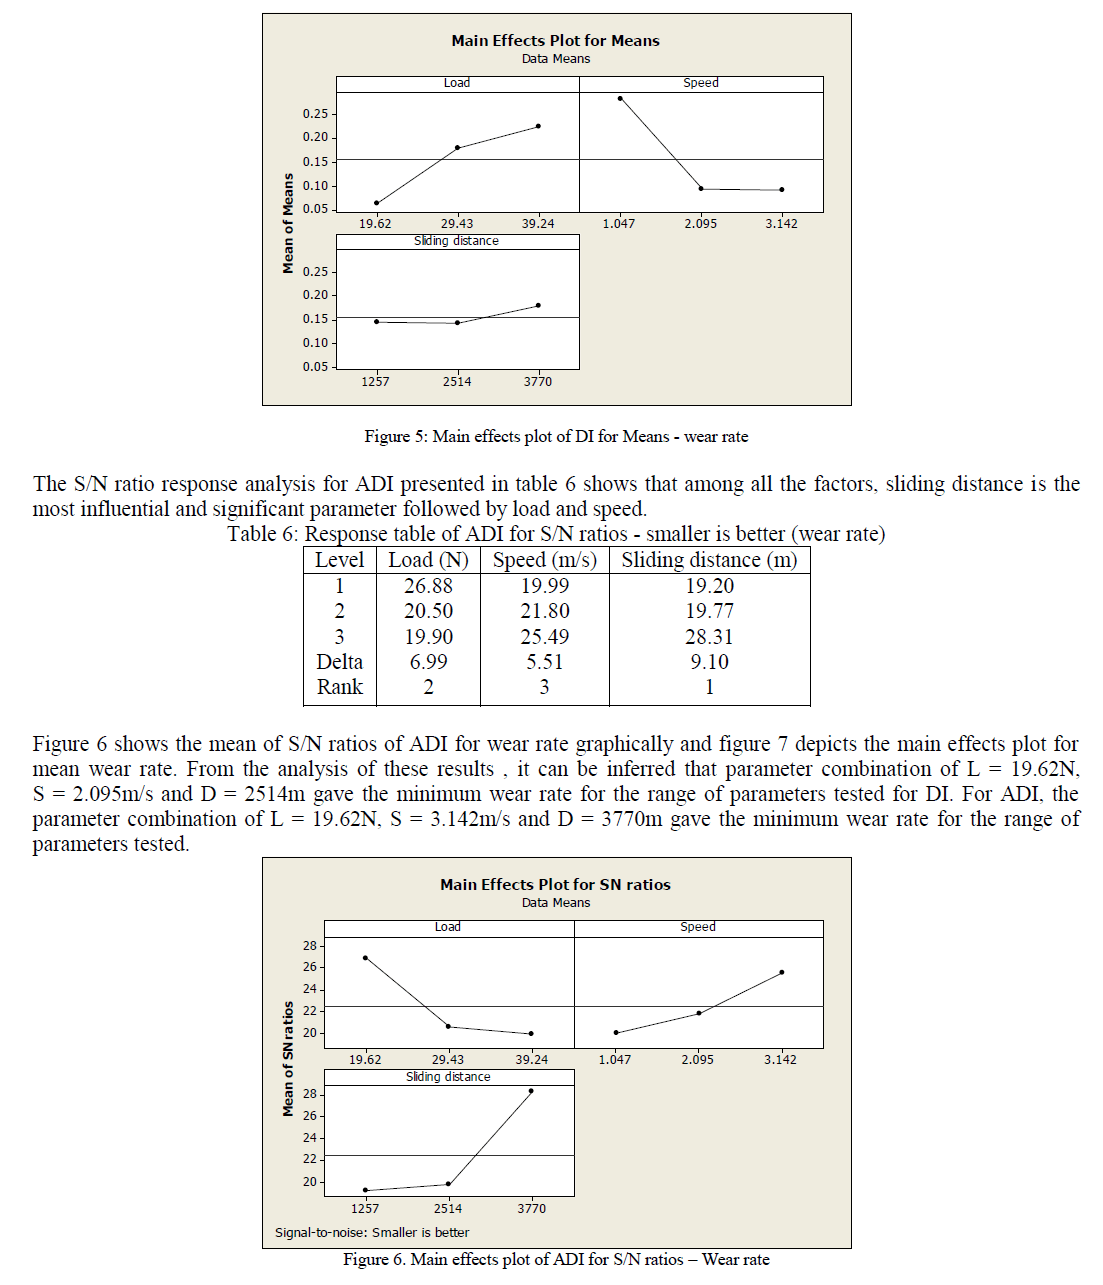
| Table 3 shows the experimental results of wear rate. The wear rate is expressed as volume loss per unit sliding distance in m3/m. |
 |
 |
 |
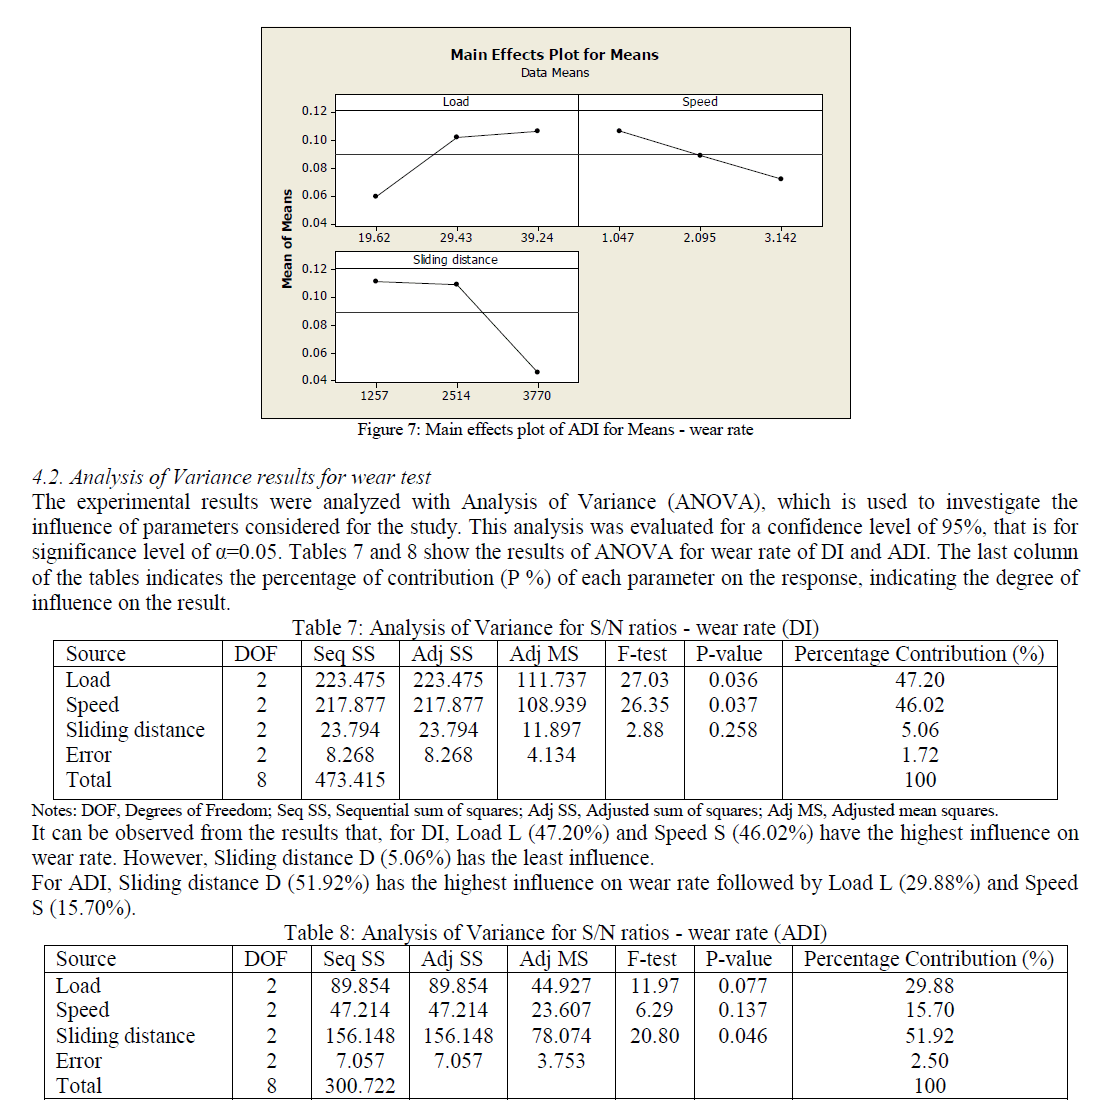 |
| The coefficient of determination (R2) is defined as the ratio of the explained variation to the total variation. It is a measure of the degree of fit. When R2 approaches unity, a better response model results and it fits the actual data. The value of R2 calculated for this model was 0.975 that is reasonably close to unity and thus acceptable. It demonstrates that 97.5% of the variability in the data can be explained by this model. Thus it is confirmed that this model provides reasonably good explanation of the relationship between the independent factors and the response. |
| Multiple Linear Regression Model |
| A multiple linear regression analysis attempts to model the relationship between two or more predictor variables and a response variable by fitting a linear equation to the observed data [18, 19]. Based on the experimental results a multiple linear regression model was developed using MINITAB 15. A regression equation thus generated establishes correlation between the significant terms obtained from ANOVA, namely, load, sliding speed and sliding distance. The regression equations developed for DI and ADI are as follows. |
| Wear rate (DI) = 0.0706 + 0.008282 L - 0.09184 S + 0.00001339 D-------------------- (2) |
| Wear rate (ADI) = 0.11837 + 0.002443 - 0.01664 S - 0.00002625 D-------------------- (3) |
| The above equations can be used to predict the wear rate of Ductile Iron and Austempered Ductile Iron. The constant in the equation is the residue. The regression coefficient obtained for the model was 0.975 and this indicates that wear data was not scattered. From the above regression equations for wear rate, we found that wear rate of DI is directly proportional to the load (L) and sliding distance (D) and inversely proportional to the sliding speed (S) and wear rate of ADI is directly proportional to the load (L) and inversely proportional to the sliding speed (S) and sliding distance (D). The wear rate associated with load (L) in the regression equations (2) and (3) is positive and it indicates that as the load increases, wear rate also increases for DI and ADI. Similar results have been observed in the study of dry sliding wear behavior of Al-2219/SiC [20]. |
| Confirmation Test |
| In order to validate the regression model, confirmation wear tests were conducted with parameter levels that were different from those used for analysis. The different parameter levels chosen for the confirmation tests are shown in table 9. |
 |
| The results of the confirmation test were obtained and a comparison was made between the experimental wear rate values and the computed values obtained from the regression model (table 10). The error between the experimental values and the computed values from the regression model for ADI was less than 6%. Hence, the regression model developed demonstrated a feasible and effective way to predict the wear rate of ADI. Similar results were obtained in the study of dry sliding wear behavior of HMMCs [21]. |
 |
CONCLUSION |
| Taguchi’s method is used to find the optimum conditions for dry sliding wear of Austempered Ductile Iron. The following are the conclusions drawn from the present study. |
| 1. Optimum wear rate was obtained from the experimental results using Taguchi method. |
| 2. The wear rate of Austempered Ductile Iron is dominated by different parameters in the order of sliding distance, load and sliding speed. It is concluded from the ANOVA test that as sliding distance increases the wear rate also increases significantly. |
| 3. Applied load, L = 19.62N, sliding speed, S = 3.142m/s and Sliding distance, D = 3770m are the optimum conditions for wear rate. |
| 4. The parameter sliding distance (51.92%) has the highest influence on the dry sliding wear rate of ADI than the other parameters applied load (29.88%) and sliding speed (15.70%). |
| 5. From the regression equation for wear rate of ADI, it is found that wear rate is directly proportional to the applied load and inversely proportional to the sliding speed and sliding distance. |
| 6. From confirmation tests, it is found that the errors associated with wear rate calculations ranges between 2.64% to 5.63%. Hence it can be concluded that design of experiments by Taguchi method is a powerful technique for calculating wear rate from the regression equation. |
| 7. Austempering heat treatment increased the wear resistance of Ductile Iron. |
References |
|