ISSN ONLINE(2319-8753)PRINT(2347-6710)
ISSN ONLINE(2319-8753)PRINT(2347-6710)
R. N. Patil1, and B.B Ahuja1
|
| Related article at Pubmed, Scholar Google |
Visit for more related articles at International Journal of Innovative Research in Science, Engineering and Technology
Grinding is one of the most popularly used surface finishing process characterized by excellent process capabilities in terms of surface finish and material removal rate. It has wide applications in manufacturing industry as it can handle a wide variety of workpiece materials and forms. However it needs very high specific energy and gives rise to very high temperature, which results into high residual stresses, micro cracks and burn. To reduce these ill effects normally coolants are employed, which reduce the friction and provides effective cooling of work wheel interface. Conventional applications of coolants are many times ineffective due to inaccessibility of the fluid to grinding zone and film boiling. Many of the conventional coolants pose health hazard and support the green house effect. This paper deals with the use of solid lubricant, Molybdenum Disulphide carried in the proper medium to grinding zone and reducing the friction and hence eliminating the thermal ill effects on the grinding process. Results show that the grinding force, grinding energy and the surface roughness decreases with the help of the use of Molybdenum Disulphide compared with dry grinding and grinding with the conventional coolants.
Keywords |
| Coolant; Lubricant; Molybdenum Disulphide; Taguchi method. |
I. INTRODUCTION |
| Grinding is the process of material removal in the form of small chips by mechanical action of abrasive particles bonded together in grinding wheel. It is basically a finishing process employed for producing close dimensional and geometrically accuracies and smooth surface finish. However in some applications, the grinding process is applied for higher material removal rates and is also referred as abrasive machining[1]. It is distinguished from many other machining processes on aspects like tool geometry, large contact area and high friction between tool and workpiece and high specific energy requirement. The high specific energy consumed during the grinding process results into heat. Major portion of heat is transferred to workpiece[2]. The severe heat input affects the workpiece quality. It may induce thermal damage such as burn, surface and subsurface cracks, metallurgical phase transformations, residual tensile stresses and dimensional distortions and many more ill effects[3-5]. To control the ill effects of heat generated during the grinding process at the cutting zone and ensure the quality of the workpiece, coolants are employed. Grinding fluids are introduced into grinding operations to reduce and transfer heat during grinding, lubricate during chip formation, wash the grinding wheel of loose chip and swarf, chemically aid the grinding action or machine maintenance. Grinding fluids of five different categories are used popularly. These are petroleum base and mineral base cutting oils, water soluble oils, synthetic fluids, semi synthetic fluids, water plus additives, including rust inhibitors, water treatments (for examples, softeners), and defoaming agents. |
| Several researchers have carried out research on the coolant type, its composition and supply characteristics[6]. However, during grinding operation coolants are relatively inaccessible to the grinding arc. Therefore, often it is ineffective in reducing the grinding zone temperature, but only provides bulk cooling of the work piece. The stiff boundary layer forming around the rotating grinding wheel also inhibits the access of the fluid to the grinding zone[7, 8]. Conventional coolants lose their cooling properties upon film boiling and that the film boiling temperature of these coolants are lower which affects the effectiveness of grinding fluid[9]. However, flooded coolant operation allows effective removal of grinding swarf, which is needed in grinding. Conventional grinding fluids are a source of environmental hazards and increasingly strict regulations are coming up with regard to their use and disposal[10]. The cost of these fluids is also high. As an alternate to conventional fluids several other coolants/ lubricants are tried. |
| Some efforts have been carried out with the help of solid lubricants as a substitute which has shown substantial improvement in the process[11]. Further these factors prompted investigations on the use of biodegradable coolants, minimum quantity coolant and coolant free grinding[12]. But any attempt to minimize or avoid the coolant can be dealt with only by the substitution of the functions normally met by the coolants by some other means. Grinding employing cryogenic cooling by liquid nitrogen and minimum Quantity Lubrication (MQL) by ester oil supplied in the form of spot jet or spray mist are the alternative approaches towards this end. The effect of graphite nanoplatelets in solid lubrication grinding are also studied which gives effective way of improving the process[13]. The results are very encouraging but the required amount of nanomaterial significantly increases the overall cost. |
| The objective of the present investigation is to employ molybdenum disulphide, which is a high temperature solid lubricant, as a means to reduce the heat generated at the grinding zone and study the process performance. An experimental set-up is designed and built for comparative performance analysis of molybdenum disulphide assisted grinding with dry and conventional flooded coolant grinding. |
II. EXPERIMENTAL SETUP |
| An experimental set up is designed and fabricated to ensure proper delivery of the solid lubricant with the carrier to the grinding zone. This is devised with the help of dead weight loaded cylinder. The mix of molybdenum disulphide and the carrier oil is introduced into the cylinder. Constant pressure is maintained on this mix with help of a piston which is in turn loaded by the dead weight mounted on the piston rod as shown in Fig. 1. The flow of mix is controlled with the help of the flow control valve. The mix is impinged on the grinding zone through a nozzle with an opening of 1mm * 25 mm. The width of the opening corresponds to the width of grinding wheel. The mix is first delivered to the soft rubber wheel, which is free to rotate and is maintained in constant contact with the grinding wheel. The paste is eventually transferred to the grinding wheel and then to the grinding zone to serve as a lubricant in the grinding zone. |
 |
| 2.1 Primary Experimentation |
| The grinding operation is carried out on horizontal reciprocating table surface grinding machine. The test specimen of size 100 mm* 50 mm * 10 mm thickness is used for the experimentation. Grinding is carried out along the length of the workpiece. |
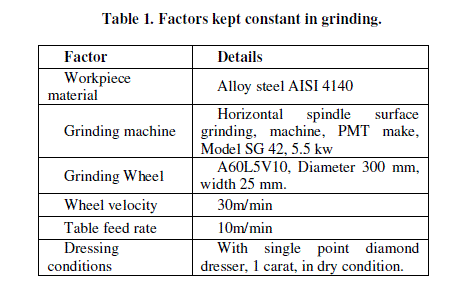
| The ultimate effect in which industry is primarily interested is the quality of surface finish obtained through the process and the amount of energy consumed for the process. Hence for primary investigations following factors ar e kept constant. The details of which are provided in Table 1. |
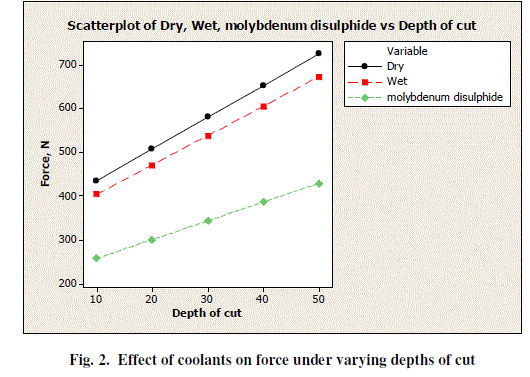
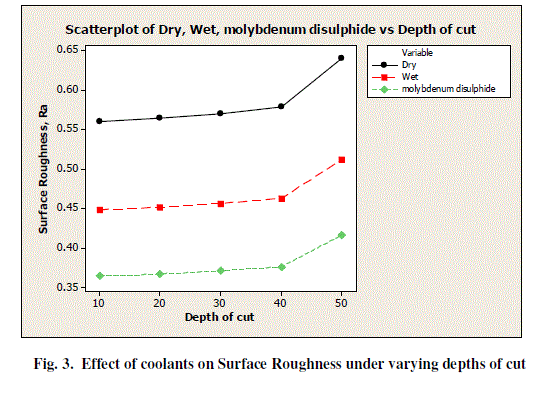
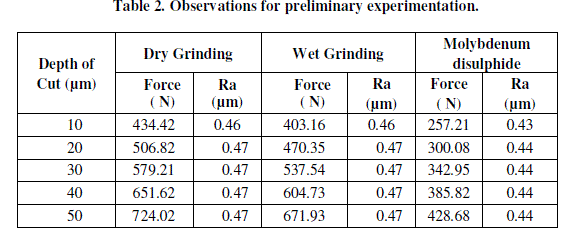
| Primary experimentation is carried out on alloy steel AISI 4140 to observe the effect of uses of solid lubricants on the process. The results of experimentation are tabulated in Table 2. |
 |
 |
| 2.2 Taguchi methods for design of experiments |
| Taguchi methods of experimental design provide a simple, efficient and systematic approach for the optimization of experimental designs for performance quality and cost. It has been proved successful to many manufacturing situations. The traditional experimental design procedures focus on the average product or process performance characteristics. But the Taguchi method concentrates on the effect of variation on the product or process quality characteristics rather than on its averages. That is, the Taguchi’s approach makes the product or process performance insensitive (robust) to variation to uncontrolled or noise factors. Taguchi recommends that this can be done by the |
| proper design of parameters during the ‘parameter design’ phase of off-line quality control. He designed certain standard orthogonal arrays (OAs) by which simultaneous and independent evaluation of two or more parameters for their ability to affect the variability of a particular product or process characteristic can be done in a minimum number of tests. Subsequently, decision is made for the optimum combination of these parameters. The following objectives are fixed for the study: |
| i) Find out the effect of use of molybdenum disulphide on force required for grinding and surface roughness obtained, and |
| ii) Conduct a comparative study of the applications to various alloy steels. The surface roughness (Ra) of the ground piece and the force required (F) are taken as the quality characteristics of the process. The surface finish is a direct process result and is measured by a Mitutoyo surftest. For force measurements a dynamometer is used, which recorded the two components of force. The resultant force is worked out and is considered as a single response. |
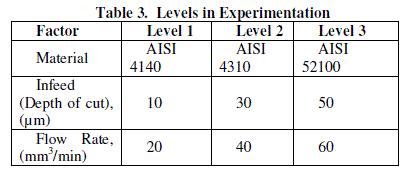
| The operating conditions such as speed and feed are held constant during the experimentation. However, infeed rate, workpiece material and flow rate of the lubricant is considered for variation. Three levels, having equal spacing, within the operating range are selected for each of the factors as shown in Table 3. By selecting three levels the curvature or the non-linearity effects could be studied. |
 |
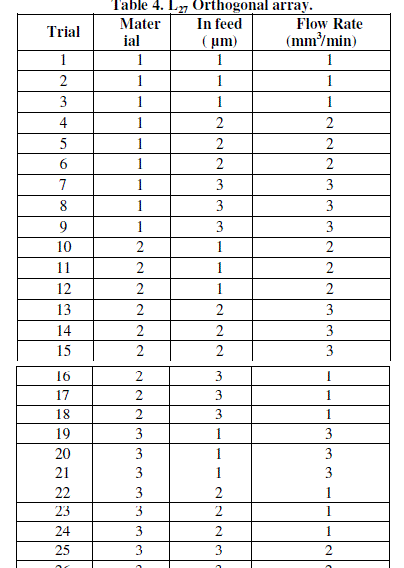
| Table 4 shows the experimental layout of an L27 0rthogonal array consisting of three control factors and three levels according to Taguchi’s suggestion. The numbers in each column indicate the levels for the specific factors and from the L27 orthogonal array 27 experiments are required to examine the total manufacturing parameters. The L27 orthogonal Array which meets this requirement is selected. |
 |
 |
| 2.3 Experimentation |
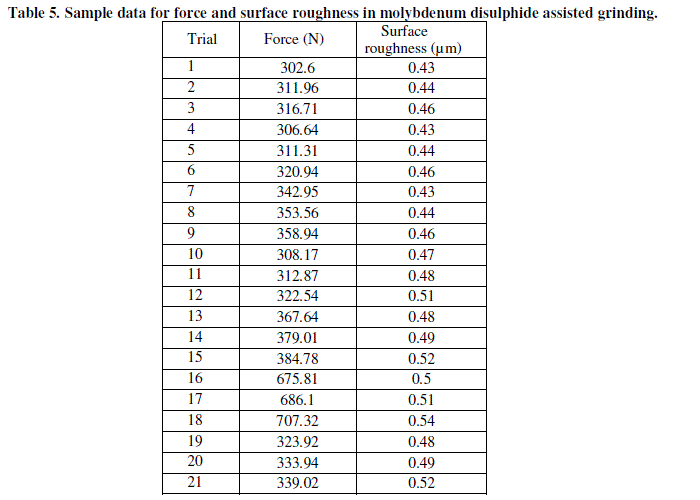
| By choosing the L27 orthogonal array the issue of repeating the tests is sorted out, as the array itself recommends the repetitions. This helps to obtain more reliable information from the statistical analysis of the experiment. Quality characteristics, i.e. surface roughness (Ra) in μm and force (F) in N are noted by the measurement systems. For having consistent results with Ra, pieces are ground giving seven sets of upward and downward spark out passes. The sample data obtained for the quality characteristics, i.e. surface roughness (Ra in μm) and force in N in the molybdenum disulphide assisted grinding is shown in Table 5. It is observed that there is considerable consistency in the obtained data and it is reliable for statistical analysis. |
 |
 |
| 2.4. Analysis of the data |
| 2.4.1. Evaluation of S/N ratios |
| Taguchi suggests the transformation of the repetition data in a trial into a consolidated single value called the S/N ratio. Here, the term ‘signal’ represents the desirable value (mean) and the ‘noise’ represents the undesirable value (standard deviation). So the S/N ratio represents the amount of variation present in the quality characteristic. Depending upon the objective of quality characteristic there can be various types of S/N ratios. Here the desirable objectives, the force required for the grinding operation and the surface roughness should be lower. Hence the lowerthe- better type S/N ratio, as given below is applied for transforming the observed data: |
| Z = -log10 {sum (y**2)/n} |
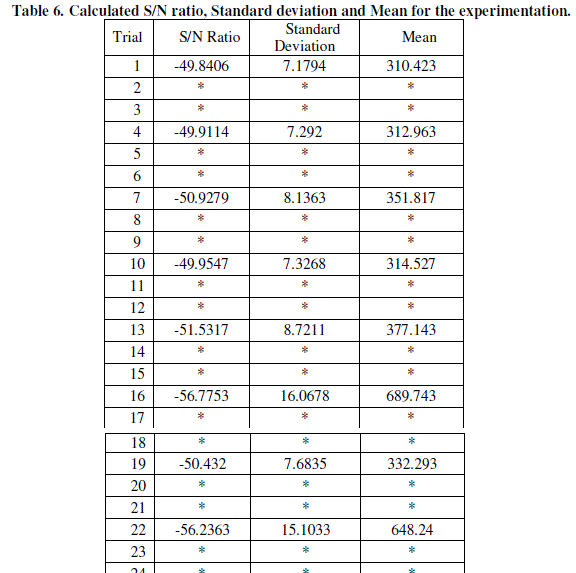
| Where Z is the S/N ratio for the lower-the-better case, y is the measured quality characteristic for the ith repetition, and n the number of repetitions in a trial. The S/N ratios, standard deviation and mean for grinding force for molybdenum disulphide assisted grinding for various alloy steels, the varying flow rates and infeed rates are calculated from the observed data and tabulated in Table 6. |
 |
 |
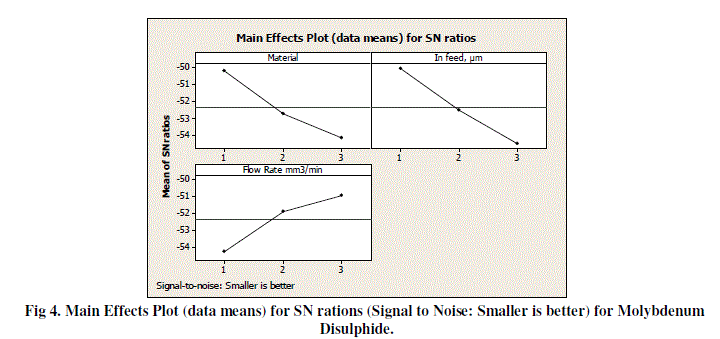
| From the calculated values of signal to noise ratio, the values are obtained for the various levels of the factors and tabulated in Table 7. |
 |
| The main effect plot (the data means) for the calculated S/N ratio is calculated and presented graphically as shown in the Fig. 4. The highest S/N ratio always yields the optimum quality with minimum variance. Therefore, the level with a higher value determines the optimum level of each factor. For the experimentation carried out the best results would be obtained for AISI4140, the workpiece material, infeed rate of 10 μm, and flow rate of 60mm3/min. |
 |
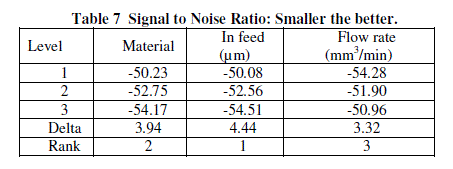
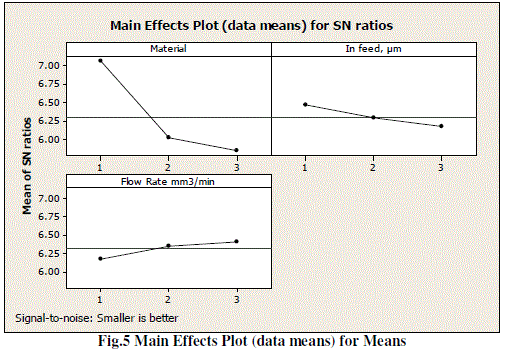
| From the calculated values of means, the values are obtained for the various levels of the factors and tabulated in Table 8 and the same is represented graphically in the Fig. 5 |
 |
 |
| 2.4.2 The regression Analysis |
| Taguchi technique can be used for the prediction of the full factorial design. The regression equation from full factorial prediction is |
| F = 371 + 0.181 Ʈs + 5.86 d - 4.89 f |
| Where, F is the grinding force in Newton, Ʈs is the shear stress of workpiece material in MPa, d is the infeed in micrometers and f is flow rate in mm3/min |
 |
| 2.4.3. Analysis of Variance |
| ANOVA is a computational technique to estimate quantitatively the relative contribution which each controlled parameter makes on the overall measured response and is expressed as a percentage. Thus information about how significant the effect of each controlled parameter is on the experimental results can be obtained. The total variation in |
| response is decomposed into variation due to various controlled factors and their interactions and due to the error involved in the experimentation. The ANOVA can be done with the raw data or with the S/N data. The ANOVA based on the raw data signifies the factors which affect the average response rather than reducing the variation. But ANOVA based on the S/N data takes into account both these aspects and so it is used here. Since it is a saturated design where all columns are assigned with the factors, the variations due to error are estimated by pooling the estimates of the factors having least variance. This also helped in determining the Fisher test (F-test) factor for finding out the confidence level of the results. The ANOVA is done for all the quality characteristics under study. |
 |
III. INTERPRETED GRAPHS FOR FORCE AS A QUALITY CHARACTERISTIC: |
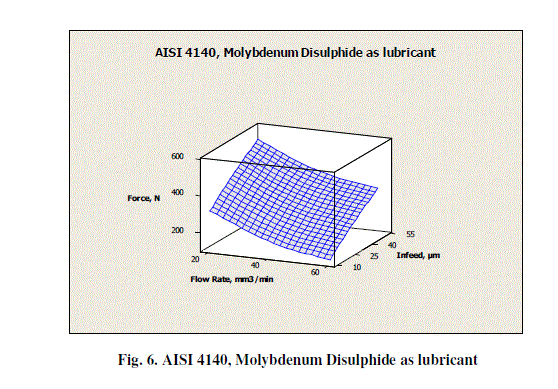
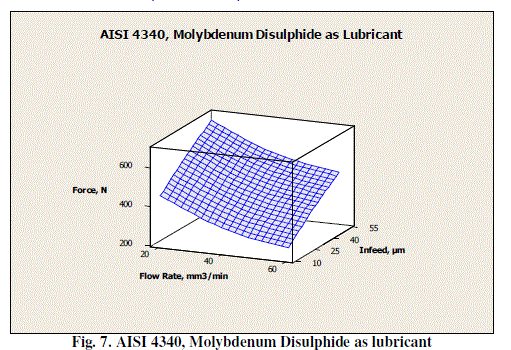
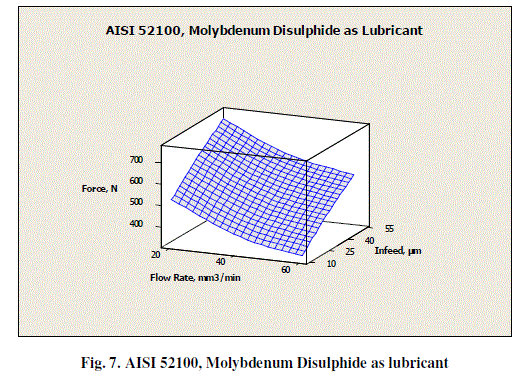
| On the basis of the interpreted results of force required for grinding operation with the help of molybdenum disulphide as solid lubricant for the materials selected, AISI 4140, AISI 4340 and AISI 52100 are given in Fig.6 to Fig. 8. |
 |
 |
IV. ANALYSIS FOR SURFACE ROUGHNESS |
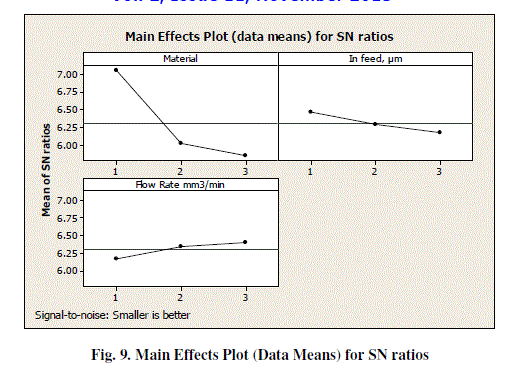
| On the similar lines of the force, Taguchi analysis is done for surface roughness obtained in the molybdenum disulphide assisted grinding process. The S/N ratios, standard deviation and mean for surface roughness for molybdenum disulphide assisted grinding for various alloy steels, the varying flow rates and infeed rates are calculated from the observed data are tabulated in Table 10. |
 |
| From the calculated values of signal to noise ratio, the values are obtained for the various levels of the factors and tabulated in Table 11 |
 |
 |
| The main effect plot (the data means) for the calculated S/N ratio is calculated and presented graphically as shown in the Fig. 9. The highest S/N ratio always yields the optimum quality with minimum variance. Therefore, the level with a higher value determines the optimum level of each factor. For the experimentation carried out the best results would be obtained for AISI 52100, the workpiece material, infeed rate of 10 μm, and flow rate of 60mm3/min. |
| From the calculated values of means, the values are obtained for the various levels of the factors and tabulated in Table 12 and the same is represented graphically in the Fig. 10. |
 |
 |
| 4.1 The regression Analysis |
| Taguchi technique can be used for the prediction of the full factorial design. The regression equation from full factorial prediction is |
| Ra= 0.461 + 0.000050 Ʈs + 0.000417 d - 0.000333 f |
| Where, Ra is the grinding force in Newton, Ʈs is the shear stress of workpiece material in MPa, d is the infeed in micrometers and f is flow rate in mm3/min |
 |
V. INTERPRETED GRAPHS FOR SURFACE FINISH AS A QUALITY CHARACTERISTIC |
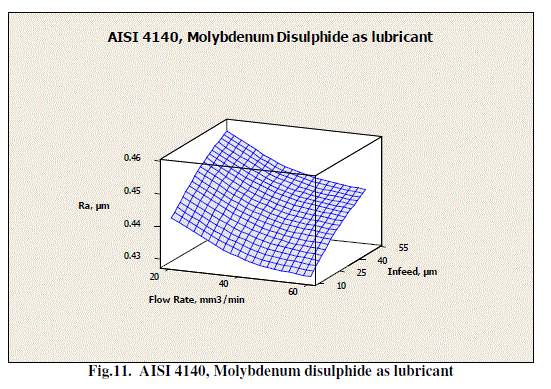
| On the basis of the interpreted results of surface roughness obtained in grinding operation with the help of molybdenum disulphide as solid lubricant for the materials selected, AISI 4140, AISI 4340 and AISI 52100 are given in Fig. 11 to Fig. 13. |
 |
 |
VI. CONCLUSIONS |
| The experimental setup developed for the application of molybdenum disulphide as a means to reduce the heat generated in the grinding zone has been investigated for improving the surface finish and reducing the cutting forces involved in the process. The Taguchi method of experimental design is used for the investigations. When compared with the dry grinding and grinding with the conventional coolants, molybdenum disulphide gives considerably reduces the force required for grinding operation and the surface finished improved. Hence the effective role of molybdenum disulphide as a lubricant was evident from the improvement of output parameters. Similar experimentation can be carried out with other solid lubricants like graphite, zinc phosphate and boric acid, which may lead to most effective solid lubricant for surface grinding. |
References |
|