ISSN ONLINE(2319-8753)PRINT(2347-6710)
ISSN ONLINE(2319-8753)PRINT(2347-6710)
J. Satheesh1 , Tajamul Pasha2, Harish3 , T. Madhusudhan4
|
| Related article at Pubmed, Scholar Google |
Visit for more related articles at International Journal of Innovative Research in Science, Engineering and Technology
Metal matrix composite (MMC) is an advanced engineering material possessing numerous favourable characteristics like light weight, high strength, high stiffness , ability to be operated at elevated temperatures etc. However, it is very difficult to machine these materials as they contain very hard abrasive ceramic as a dispersed phase in a ductile material matrix phase. Our study aims at casting of AlSiC composite rods with 25% w/w SiC as a composition. The study employs CNC turning operation and Taguchi's L8 orthogonal array is used for experimental design. An attempt is made to optimise the effects of the three parameters viz. Cutting Velocity, Feed Rate and Depth of Cut on the Surface Roughness values (Ra and Rz). Analysis of Variance (ANOVA) has been performed to know the effects of these three factors on the responses using statistical software MINTAB 16.
Keywords |
| Machining, Cutting Parameters, Anova, Statistical Analysis |
I. INTRODUCTION |
| Metal matrix composites are widely used composite materials in aerospace, automobile, electronics and medical industries. This is because of their superior mechanical properties like strength to weight ratio and high thermal conductivity. The desired properties are mainly manipulated by matrix, the reinforcement element and the interface. These composites are manufactured by introducing hard ceramic reinforcements such as zirconia, alumina, silicon carbide (SiC) into a base matrix elements like aluminium, magnesium or titanium alloy in the form of particulates, fibres or whiskers[1-4]. |
| There are several methods to manufacture MMCs but the stir casting is very popular method. The properties of the particle reinforced metal matrix composites produced by this way are influenced to a large extent by type, size and weight of fraction of the reinforcing particles and their distribution in the cast matrix. |
| An enduring problem with MMCs is that they are difficult to machine due to high hardness and abrasive nature of reinforcing particles which in many cases are significantly harder than the commonly used high speed steel (HSS) tools and carbide tools[5-7]. These results in rapid tool wear and poor quality of the machined surface. Most of the researchers reported that Poly-Crystalline Diamond (PCD) tools and CVD (Chemical Vapour Deposition) are the most preferred one to machine (either turning or milling) MMCs. |
| The difficulties associated with the machining of MMCs need to be minimised if these materials are to be used more extensively. In the present investigation an attempt is made is made to study the effects of cutting variables on surface roughness in CNC turning of AlSiC by performing analysis of performance. Cutting Velocity, Feed Rate and Depth of Cut are chosen as the influencing parameters and a 23 full factorial (Taguchi's L8 orthogonal array) design of experiments was carried out to collect the experimental data and to analyse the effect of these parameters on surface roughness values [8-14]. The statistical software MINITAB 16 is used to perform ANOVA. |
II. EXPERIMENTAL DETAILS |
| 2.1 Work Material |
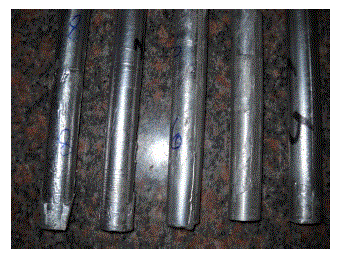
| The master material with composition of Al as 75% and SiC 25% is selected. The eight test specimens are cast into Ø21x230mm sizes. Specimens are rough machined to get the shaft. The diameter is maintained at 19.3mm to ensure rigidity in the chuck. The specimens are machined with three different input parameters for 60mm length on each piece. |
 |
| 2.2 Experimental Plan and Procedure |
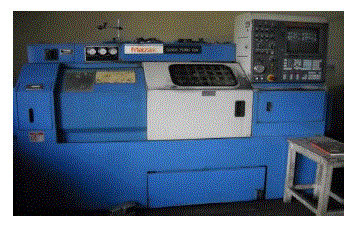
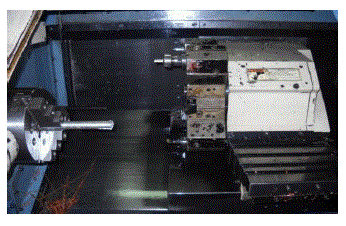
| The experiments were carried out on a CNC turning centre machine (MAZAK Quickturn 15N) at Government Tool room and Training centre (GT&TC), Mysore, India. Specimens of Ø19.3x230mm size were used for the experimentation. The test specimen was mounted in a chuck. |
 |
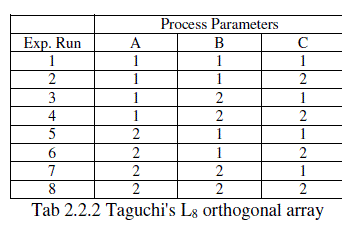
| The required cutting velocity, feed rate and depth of cut were incorporated in CNC part programming to perform the operations as per Taguchi's L8 orthogonal array. Each sample was marked with corresponding trial number to identify the conditions used. The steps were repeated until the whole experiment was complete. The two levels of the process parameters/factors are given below. |
 |
| where A is cutting velocity (m/min), B is feed rate(mm/rev) and C is depth of cut (mm). |
| The process parameters for eight different specimens were based on Taguchi's L8 orthogonal array which can be tabulated as follows. |
 |
| The instrument used for measuring the surface was surface tester. Zeiss Surfcom 130A was used to measure the roughness of each trial sample. The test was conducted for 40mm length of the specimen. |
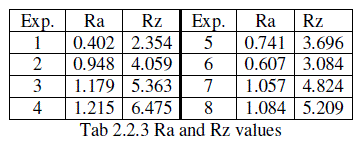
| The surface roughness values (Ra and Rz) for all the eight specimen can be tabulated as follows. |
 |
III STATISTICAL ANALYSIS |
| The mathematical relationships between responses and machining parameters was established using multiple regression analysis. In the present study, the correlation between the process parameters cutting velocity, feed rate, depth of cut and surface roughness are established. The multiple linear regression models were obtained using MINITAB 16. |
| Ra = - 1.57387 + 0.0064125 A + 19.189 B + 2.0701 C - 0.0251 AB - 6.98 BC - 0.00689 CA |
| Rz = - 6.13775 + 0.035525 A + 78.598 B + 6.4726 C - 0.2172 AB + 8.08 BC - 0.03044 CA |
IV ANALYSIS OF VARIANCE (ANOVA) |
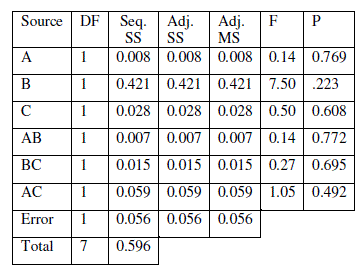
| Analysis of Variance (ANOVA) is a method of apportioning variability of an output to various inputs. Below table shows the results of ANOVA analysis. The purpose of the analysis of variance is to investigate which machining parameters significantly affects the performance characteristics. |
| The following tables were obtained after performing ANOVA for Ra and Rz. |
 |
V. OPTIMISATION AND ANALYSIS RESULTS |
| Based on the mathematical model given by equations for Ra and RZ, the study on the effects of various machining parameters on Ra and Rz have been made so as to analyze the suitable parametric combinations that can be made for achieving controlled surface roughness. The plots were obtained for various combinations of cutting velocity versus surface roughness (both Ra and Rz), feed rate versus surface roughness and depth of cut versus surface roughness. These plots are as follows. |
 |
VI. CONCLUSION |
| The paper examines the influence of cutting velocity, feed rate and depth of cut on surface roughness in CNC turning of Al/SiC metal matrix composites. A functional relationship between the surface roughness and cutting parameters is established using the principles of Regression Analysis. The goodness of fit between the developed model and the experimental results is further evaluated through Analysis of Variance (ANOVA) and F-ratio test. In the light of the above analysis, the following conclusions are established. |
| The use of ANOVA to analyze the influence of process parameters like cutting speed, feed rate, depth of cut is a useful tool for achieving the best surface finish in the Aluminum silicon carbide composite. |
| Results of Analysis of Variance (ANIOVA) for Ra and Rz values as obtained in tables 3.1 and 3.2 respectively indicate that the feed rate is the most significant machining parameter for affecting the performance characteristics followed by cutting velocity and depth of cut. |
| From Fig 5.1, it is observed that the feed rate has a minimum influence on surface roughness values at 0.05 mm/rev and increasing thereafter. |
| It can also be concluded from the same figure that Feed Rate is the most influential factor and directly proportional for increase in surface roughness i.e. as feed rate increases the surface roughness also increases. Hence reduced feed is desirable for minimum surface roughness. |
| From the main effects plot, it can also be inferred that the surface roughness also improves with increase in cutting velocity. |
| Moderate cutting velocity, lower feed rate and higher depth of cut are the ideal machining conditions for machining Aluminum Silicon Carbide Composite. |
| Moderate cutting velocity, lower feed rate and higher depth of cut are the ideal machining conditions for machining Aluminum Silicon Carbide Composite. |
| From our experimental values, it can be noticed that the best surface roughness values are obtained as 0.402μm and 2.354μm for Ra and Rz values respectively at Cutting Velocity 140m/min, Feed Rate 0.05mm/rev and Depth of Cut 0.5mm. |
References |
|