ISSN ONLINE(2319-8753)PRINT(2347-6710)
ISSN ONLINE(2319-8753)PRINT(2347-6710)
Mihir T. Patel 1, Vivek A. Deshpande2
|
| Related article at Pubmed, Scholar Google |
Visit for more related articles at International Journal of Innovative Research in Science, Engineering and Technology
Alloy Steel has a wide variety of applications in different industries. The Challenge of modern machining industries is mainly focused on achieving high quality, in term of part/component accuracy, surface finish, high production rate and increase the product life with lesser environmental impact. It is necessary to change and improve existing technology and develop product with reasonably priced. So, it is necessary control the process parameter in any manufacturing process. The typical controllable machining parameters for the CNC lathe machines are speed, feed, depth of cut, tool geometry, cutting environment, tool material, work material, etc. which affect desired output like material removal rate, surface roughness, power consumption, tool wear, vibration etc. Optimization of machining parameters and also need to determine which parameters are most significant for required output. One of the technique widely used for optimization of machining parameters is Taguchi and ANOVA approach help to determine which parameters are most significant.
Keywords |
| Alloy steel, ANOVA, MRR, optimization, Review, Surface Roughness |
INTRODUCTION |
| The challenge of modern machining industries is mainly focused on the achievement of high quality, in term of work dimensional accuracy, surface finish. Surface texture is concerned with the geometric irregularities. The quality of a surface is significantly important factor in estimating the productivity of machine tool and machined parts. The surface roughness of machined parts is a significant effects on some functional attributes of parts, such as, contact causing surface friction, wearing, light reflection, ability of distributing and also holding a lubricant, load bearing capacity, coating and resisting fatigue. In manufacturing industries, manufacturers attentive on the quality and Productivity of the product. There are many factors which affect the surface roughness and material removal rate (MRR) i.e. cutting conditions, tool variables and work piece variables. Cutting conditions include speed, feed and depth of cut and also tool variables include tool material, nose radius, rake angle, cutting edge geometry, tool vibration, tool overhang, tool point angle etc. and work piece variable include hardness of material and mechanical properties. It is very difficult to take all the parameters that control the surface roughness and material removal rate for a particular process. In a turning operation, it is very difficult to select the cutting parameters to achieve the high surface finish and material removal rate. According to Roy, R. K. [16], the very intention of Taguchi Parameter Design is for maximizing the performance of a naturally variable production process by modifying the controlled factors. ANOVA used to determine the percentage contribution of all factors upon each response individually. |
| 1.1Taguchi Method |
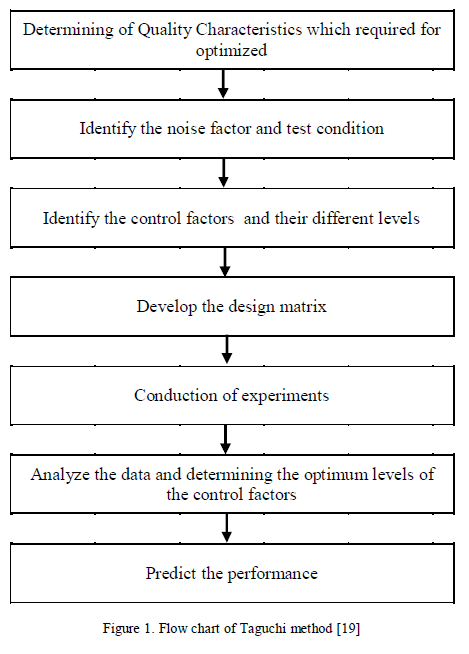
| Basically, traditional experimental design procedures are too complex and not easy to use. A large number of experimental works have to be carried out when the number of the process parameters increases with their levels. To solve this problem, the Taguchi method uses a special design of orthogonal arrays to study the entire parameter space with only a small number of experiments. The greatest advantage of this method is to save the effort in performing experiments: to savethe experimental time,to reduce the cost, and to find out significant factors fast. [17] Taguchi robust design method is a most powerful tool for the design of a high-quality system. He considered three steps in a process’s and product’s development: system design, parameter design, and tolerance design. In system design, the engineer uses scientific and engineering principles to determine the fundamental configuration. In the parameter design step, the specific values for system parameters are determined. Tolerance design is used to determine the best tolerances for the parameters [18] |
 |
| 1.2 Surface Roughness Parameters Surface roughness most commonly refers to the variations in the height of the surface relative to a reference plane. It is measured either along a single line profile or along a set of parallel line profiles (surface maps). It is usually characterized by one of the two statistical height descriptors advocated by the American National Standards Institute (ANSI) and the International Standardization Organization (ISO). These are (1) Ra, CLA (centre-line average), or AA (arithmetic average) and (2) the standard deviation or variance (σ), Rq or root mean square (RMS). Two other statistical height descriptors are skewness (Sk) and kurtosis (K); these are rarely used. Another measure of surface roughness is an extreme-value height descriptor Rt (or Ry, Rmax, or maximum peak-to-valley height or simply P–V distance). Four other extreme-value height descriptors in limited use, are: Rp(maximum peak height, maximum peak-to-mean height or simply P–M distance), Rv(maximum valley depth or mean-to-lowest valley height), Rz (average peak-to-valley height), and Rpm (average peak-to-mean height). The height parameters Ra and Rt are most commonly specified for machine components. For the complete characterization of a profile or a surface, none of the parameters discussed earlier are sufficient. These parameters are seen to be primarily concerned with the relative departure of the profile in the vertical direction only; they do not provide any information about the slopes, shapes, and sizes of the asperities or about the frequency and regularity of their occurrence. There are two methods used for measuring surface roughness. 1. Surface inspection by comparison method e.g. tough inspection, visual inspection, scratch inspection, microscopic inspection, visual inspection, surface photography, reflected light intensity etc. and 2. Direct instrument method e.g. light section method, Forster surface roughness tester, Profilograph, Tomlinson surface roughness meter, Telysurf etc. [20] 1.3 Material Removal Rate Material Removal rate (MRR) in turning is the material/metal that is removed per unit time in mm3/sec. For each revolution of the work piece, a ring shaped layer of material is removed. Material Removal Rate (MRR) = v × f × d mm3/sec Where, v = cutting speed in mm/sec d = depth of cut in mm f = feed in mm/rev A process which remove metal at faster rate may not be the economical process, since the power consumed and cost factor taken into account. Due to this, to compare two processes, the amount of metal removed per unit of power consumed is determined. This is called “specific metal removal rate” and is expressed as, mm3/W/min, if the power consumption is measured in watts. |
II. LITERATURE REVIEW |
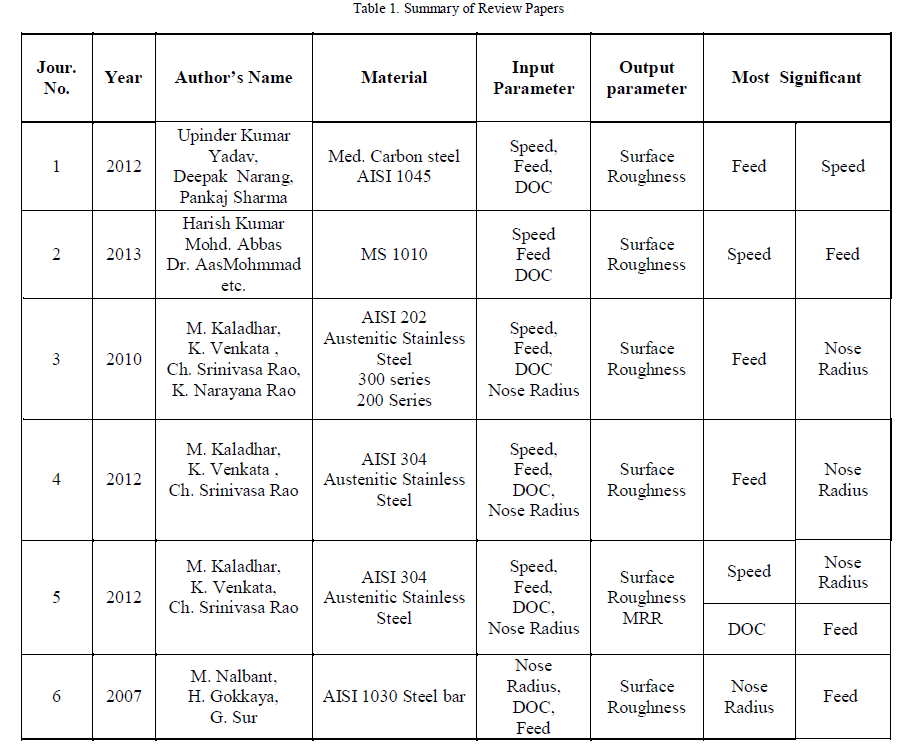
| Upinder Kumar Yadavet. al. [1] have optimized of machining parameters for surface roughness in CNC Turning by Taguchi method. Medium Carbon Steel (AISI 1045) of Ø: 28 mm, length: 17 mm were used for the turning experiments in the present study. AISI 1045 has a variety of applications in vehicle component parts & machine building industry. Surface roughness is the main quality function in high speed turning of medium carbon steel in dry conditions. In this study, the effect and optimization of machining parameters (cutting speed, feed rate and depth of cut) on surface roughness is investigated. An L27 orthogonal array, analysis of variance (ANOVA) and the signal-to-noise (S/N) ratio are used in this study. Three levels of machining parameters are used and experiments are done on STALLION-100 HS CNC lathe. They concluded that feed rate is the most significant factor affecting surface roughness followed by depth of cut. Cutting speed is the least significant factor affecting surface roughness. Harisk Kumar et. al. [2] were conducted experiments on MS 1010 by HSS tool using CNC lathe machine under dry condition. They have taken speed, feed and DOC taken as input parameters and surface roughness as output parameter for analysis. They alaysed the data using Taguchi methodology and ANOVA. They found that for MS 1010 speed is the most significant parameter for surface roughnesss and least significant parameter for surface roughness is DOC. M. Kaladharet. al. [3] have taken AISI 202 austenitic stainless steel for present investigation, full factorial experiment has been employed to determine the best combination of the machining parameters such as cutting speed, feed, depth of cut and nose radius to attain the minimum surface roughness and also predictive models obtained for surface roughness. They used 24 full factorial design for the studied. From analysis, it is observed that the feed is the most significant factor that influences the surface roughness followed by nose radius. M. Kaladharet. al. [4] were conducted experiments to turn AISI 304 austenitic stainless steel using Physical Vapour Deposition (PVD) coated inserts at four levels (Speed, feed, DOC and nose radius) of cutting parameters by using Taguchi and ANOVA approach. They took L16 mixed array for the analysed the data and MRR and surface roughness are taken as responding parameters. They found that the most significant parameter for surface roughness is feed and followed by nose radius. They also analysed that the most significant parameter for MRR is DOC and followed by feed. |
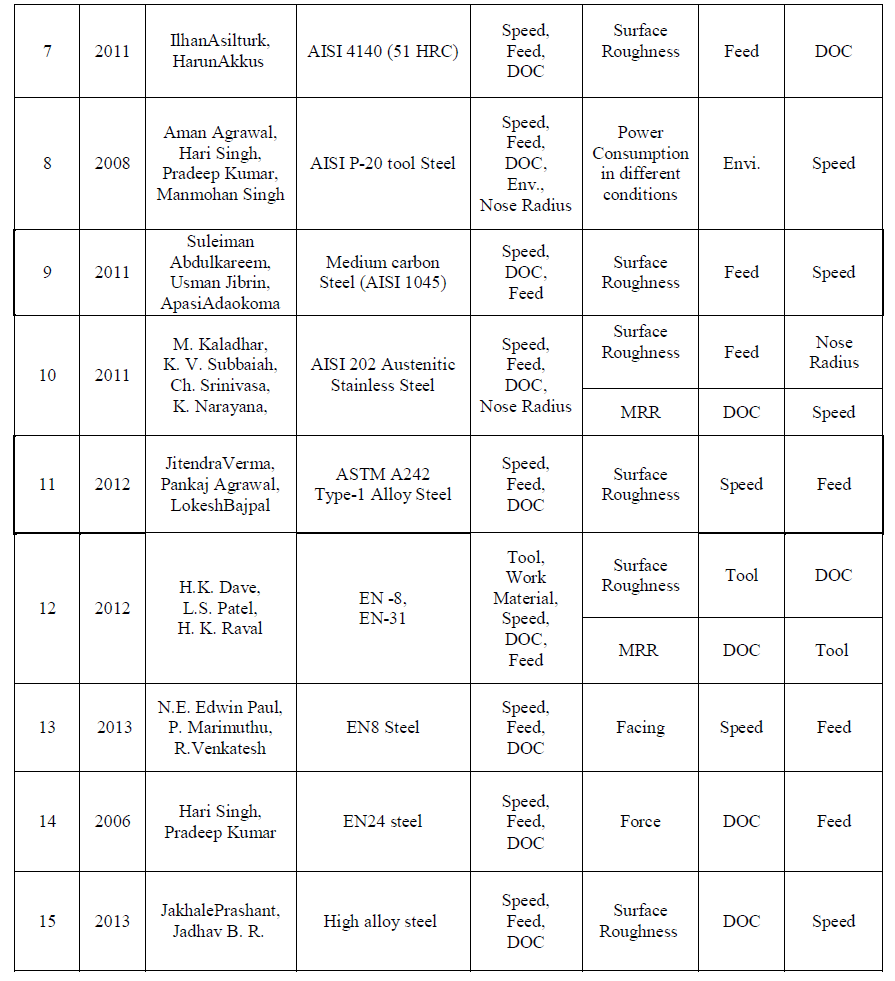
| They developed the regression model for surface roughness and also predicted the optimal range of Ra and material removal rate at 95% confidence level. M. Kaladharet. al. [5] have conducted experiment by turn AISI 304 austenitic stainless steel using Chemical Vapour Deposition (CVD) coated cemented carbide Duratomic cutting insert at four levels (Speed, feed, DOC and nose radius) of cutting parameters and analysed by employing Taguchi technique to determine the optimal levels of process parameters and ANOVA approach used to determine the which process parameters are most significant. They selected L16 mixed array for the analysed the data and they found that the cutting speed is the most significance parameter followed by nose radius for surface roughness. In case of MRR response, the depth of cut is the significance one followed by the feed. M. Nalbantet. al. [6] have taken orthogonal array, the signal-to-noise ratio, and analysis of variance for study the performance characteristics in turning operations of AISI 1030 steel bars using TiN coated tools. They took three parameters nose radius, feed rate and depth of cut for optimized the surface roughness. L9 orthogonal array was used for the study. They found that for surface roughness the percentage contributions of insert radius, feed rate and depth of cut are 48.54, 46.95 and 3.39, respectively. IlhanAsilturket. al. [7] suggested that there are a number of parameters like cutting speed, feed and depth of cut etc. which must be taken consideration during the machining of AISI 4140 (51 HRC). This study investigates the effects of process parameters on Surface roughness (Ra and Rz) in turning of AISI 4140 with coated carbide cutting tools. The optimization of surface roughness is done using nine experimental runs based on L9 orthogonal array of the Taguchi method. Results of this study indicate that the feed rate has the most significant effect on Ra and Rz. They developed model can be used in the metal machining industries in order to determine the optimum cutting parameters for minimum surface roughness. Aman Aggarwal et. al. [8] worked to findings of an experimental investigation effects of cutting speed, feed rate, depth of cut, nose radius and cutting environment in CNC turning of AISI P-20 tool steel. Design of experiment techniques, response surface methodology (RSM) and Taguchi’s technique, have been used to analyse data. L27 orthogonal array and face cantered central composite design have been used for conducting the experiments. Taguchi’s technique as well as 3D surface plots of RSM shown that cryogenic environment is the most significant factor in minimizing power consumption followed by cutting speed and depth of cut. Suleiman Abdulkareemet. al. [9] have investigated of the influence of the three most important machining parameters of depth of cut, feed rate and spindle speed on surface roughness during turning of AISI 1045. Box Behnken experimental design method as well as analysis of variance (ANOVA) is used to analyse the influence of machining parameters on surface roughness height Ra. From the experiments they concluded that the feed rate is found to be the most important parameter effecting Ra, followed by cutting speed while spindle speed has the least effect. They also found that machining with high cutting speed and spindle speed has positive effect on Raas against feed rate. M. Kaladharet. al. [10] worked to findings of an experimental investigation of effects of speed, feed, depth of cut, and nose radius on multiple performance characteristics, namely, surface roughness (Ra) and material removal rate (MRR) during turning of AISI 202 austenitic stainless steel using a CVD coated cemented carbide tool. Taguchi’s L8 orthogonal array (OA) is selected for experimental planning. They found that the most significant parameter for surface roughness is feed and followed by nose radius. They also analysed that the most significant parameter for MRR is DOC and followed by cutting speed. JitendraVermaet. al. [11] have taken ASTM A242 type-1 ALLOY steel of 250 mm long with 50 mm diameter of material for experimentation using a CNC lathe machine. L9 array taken and for analysed the data Taguchi and ANOVA approach used. They concluded that speed (57.47% contribution) is the most significant factor affecting surface roughness and followed by feed (23.46% contribution). Cutting speed is the least significant factor affecting surface roughness. H. K. Dave et. al. [12] studied on different materials like EN-8 and EN-31 in CNC turning process using TiN coated cutting tools. They selected inserts, work materials, speed, feed and DOC as machining parameters and Taguchi L8 orthogonal array. ANOVA has shown that the depth of cut has significant role to play in producing higher MRR and insert has significant role to play for producing lower surface roughness. N.E. Edwin Paul et. al. [13] were conducted experiments on EN8 material using CNC Lathe based on L9 orthogonal array. EN8 is one whose surface hardness is high and it is used for making gudgeon pins, gears etc. The signal to noise ratio and ANOVA used for the analyzed the data. The feed has greater influence on the surface roughness followed by the cutting speed. They also carried out confirmation test results proved that the determined optimal combination of machining parameters satisfy the real requirements of machining operations in the facing of EN8 materials. Hari Singh et. al. [14] optimized setting of turning process parameters (cutting speed, feed rate and depth of cut) resulting in an optimal value of the feed force when machining EN24 steel with TiC-coated tungsten carbide inserts. EN24 is a medium-carbon low-alloy steel and finds its typical applications in the manufacturing of automobile and machine tool parts. L27orthogonal array used for the study. They found that the percent contributions of depth of cut (55·15 %) and feed rate (23·33 %) in affecting the variation of feed force are significantly larger as compared to the contribution of the cutting speed (2·63 %). JakhalePrashantet. al. [15] tried to investigate the effect of cutting parameters (cutting speed, feed rate, depth of cut) and insert geometry(CNMG and DNMG type insert) on surface roughness in the high turning of alloy steel (280 BHN). The experiments have been conducted using L9 orthogonal array in a TACCHI lathe CNC turning centre. The optimum cutting condition was determined by using the statistical methods of signal-to-noise (S/N) ratio and the significance of cutting parameters and insert type on surface roughness were evaluated by the analysis of variance (ANOVA). They found that DOC is the most significant parameters which affects the surface finish and cutting speed and feed rate are least significant parameters. |
 |
 |
III. CONCLUSION |
| From the above literature review we found that most of the researcher have taken input parameters (controllable factors): speed (14 research papers out of 15 mentioned above research cases), feed (15/15) and depth of cut (15/15) and only few researcher taken input parameter: nose radius (2/15), environment (1/15) and output parameters: Surface roughness for turning (13/15), few researcher taken output parameter: material removal rate (3/15), surface roughness for facing (1 research paper out of 15 research cases). We also found that for surface roughness the most significant parameters are speed, feed and nose radius and least significant parameter is DOC and for MRR the most significant parameters are DOC, feed and speed and least significant parameter is nose radius. |
IV. FUTURE WORK |
| Material IS 2062 is widely used in industries for the different application e.g. uses for checkered plates, nuts & bolts, storage tanks, beams, channels, angles, hydraulic press rugged structures, washers, pipes & tubes, air receivers etc. and few worked on quality parameters like MRR, surface roughness for facing, power consumption, geometric tolerance like circularity, cylindricity, perpendicularity, etc. Taguchi approach help to determine optimal parameter condition for required output with help of lesser number of experiment (with help Orthogonal Array) & ANOVA approach help to determine which parameters is most significant. |
References |
|