ISSN ONLINE(2319-8753)PRINT(2347-6710)
ISSN ONLINE(2319-8753)PRINT(2347-6710)
Digvijay Kolekar1, Jewargi S.S.2
|
| Related article at Pubmed, Scholar Google |
Visit for more related articles at International Journal of Innovative Research in Science, Engineering and Technology
This paper deals with the Finite element analysis of Pressure vessels with different type of heads keeping the same cylindrical volume and thickness. The desired pressure vessel is designed as per ASME standard section VIII, division I for 8 bar pressure and 24 lit volume. Thus some end connections are tested under FEA for the cause of finding stress concentration zone in each type of pressure vessel head under the same volume and sane pressure. This paper describes, the hemispherical head and elliptical head pressure vessel has low stresses distributed as compare to other heads, so for most applications elliptical heads selected. It shows basic structure and the finite element modelling for analysing the pressure vessels with different type of heads under high stress zones.In this paper we are working on approximate stresses that exist in cylindrical pressure vessels supported on two saddles support are calculated under the different type of end connections by using Finite Element tool. Static structural analysis is done in order to calculate stresses in vessel
Keywords |
| Pressure Vessel, End connections, Stress analysis, FEA. |
INTRODUCTION |
| A pressure vessel is defined as container with internal pressure, higher than atmospheric pressure. The fluid inside the pressure vessel may undergo state of change like in case of boilers. Pressure vessel has combination of high pressure together with high temperature and may be with flammable radioactive material. because of these hazards it is important to design the pressure vessel such that no leakage can take place as well as the pressure vessel is to be designed carefully to cope with high pressure and temperature. Plant safety and integrity are one of the fundamental concerns in pressure vessel design and these depend on adequacy of design codes. In general the cylindrical shell is made of a uniform thickness which is determined by the maximum circumferential stress due to the internal pressure. Since the longitudinal stress is only one-half of this circumferential stress. The structure is to be designed fabricated and checked as per American Society of Mechanical Engineers standards .Pressure vessels are used in number of industries like power generation industry for fossil and nuclear power generation, In petrochemical industry for storage of petroleum oil in tank as well as for storage of gasoline in service stations and in the chemical industry. The size and geometric form of pressure vessel is varying from large cylindrical vessel for high pressure application to small size used as hydraulic unit of aircraft. In pressure vessel whenever expansion or contraction occurs normally as result of heating or cooling, thermal stresses are developed.There are many types of stresses developed in the vessel. Stresses are categorized into primary stresses and secondary stresses. Primary stresses are generally due to internal or external pressure or produced by moments and these are not self limiting. Thermal stresses are secondary stresses because they are self limiting. That is yielding or deformation of the part relaxes the stress (except thermal stress ratcheting).Thermal stresses will not cause failure by rupture in ductile materials except by fatigue over repeated loading applications. |
II. LITRETURE REVIEW |
| Considering the fact that required thickness of hemispherical head for internal pressure loading is only half of that necessary for the cylindrical shell, authors have tried to develop a finite element model taking due consideration on welding involved at the end connections of cylinder to shell end in modelling using shell elements to model cylinder.Some end connections are tested under FEA for the cause of resulting weight reduction of 30-35 %. The larger the shell in diameter the more the economic benefits it achieves[1]To find out the stresses at the interaction between pressure vessel cylinder walls and end caps; When modelled correctly, F.E.A. proved to be useful, but the operator also needs to be able to interpret the results properly. For the validation of F.E.A. result; the measurement of stresses by the experimental method is necessary. The analyst should be able to approximate the solution using classical methodology in order to verify the solution.[2]Finite element analysis is an extremely powerful tool for pressure vessel analysis when used correctly. Tested models were run with errors ranging from seven to nearly zero percent error and could be run in a relatively short time. However, even with such results the operator still is required to be knowledgeable of not just how to run the finite element analysis, but also how to read the results. Data must be verified with hand calculations to confirm that solutions are relatively accurate. Where results are questionable, such as in the final contact element model, one must understand just what the finite element model is modeling and how well this approximates the actual subject. For this pressure vessel, the model had a sharp corner, where in the actual pressure vessel there is a small radius which reduces the stress.[3]This paper presents the results of computations fordetermining the stresses in a pressure vessel with a conicalhead. The accurate bending theory of shells is used to evaluatethe local bending stresses in the neighbourhood of the junctionof the conical head and the cylindrical body. In a cylindrical pressure vessel with a conical head, the greatest stress is the axial stress at the junction. It may be located in the cylinderor the cone. To minimize the stress, it is desirable to make the cone andcylinder equally thick if the angle does not exceed 45 deg.[4] in this paper expands with accumulation of plastic strain. Both ratcheting strain and viscoplasticstrain rates reduce with the increase of elastic domain, and the total strain willbe saturated finally.a physicalexperiment of a thin-walled pressure vessel subjected to cyclic internal pressure hasbeen carried out to verify the feasibility and effectiveness of this noncyclic method. Bycomparison, the accumulated strains evaluated by the noncyclic method agreed well withthose obtained from the experiments. The noncyclic method is simpler and more practicalthan the cycle-by-cycle method for engineering design.[5] In this study an analytical solution for elastic thin-walled cylinder- truncated cone shell intersection under internal pressure ispresented. Although the different intersection problems had beensolved by the various methods, due to complicity of the generaltheory in cone, this problem has not been considered so far. Theauthors used edge solution to calculate stresses in circumferentialand longitudinal directions. The results show that the stresses invicinity of the intersection location can be exceeded even morethan two times of the membrane stresses in some apex angle ofthe cone. This emphasizes on the effects of the apex angle of thecone in diversion from the membrane theory prediction.[6] |
III. MATERIAL PROPERTIES AND DESIGN CALCULATIONS |
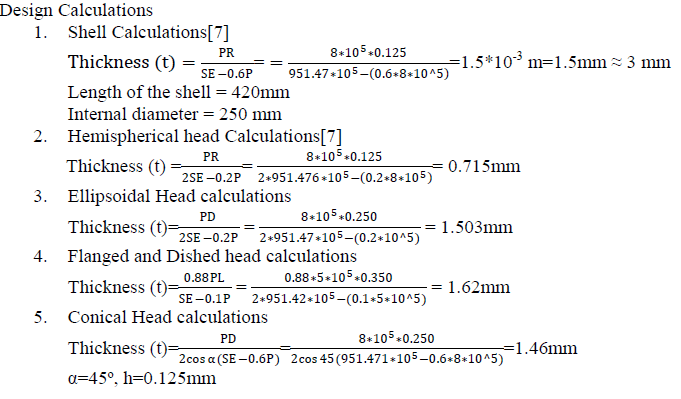
| The vessel has been designed considering various parameters such as internal pressure, volume etc. based on ASME codes. For the required quantity of fluid to be stored, the length and diameter of the vessel have been chosen according to the codes and requirements. |
 |
 |
IV. FINITE ELEMENT ANALYSYS |
| Finite element analysis is a powerful tool in the field of engineering. While finite element analysis offers another way to analyze structures, it requires an understanding of the program and subject being modeled. The stress Analysis with the help of Finite Element Method is necessary to find out the exact behavior of pressure vessel .To find out the stresses at the interaction between pressure vessel cylinder walls and end caps. FEA proved to be useful, but the operator also needs to be able to interpret the results properly. This project set out to explore applicable methods using finite element analysis in pressure vessel analysis. |
 |
| Meshing of pressure vessel for static structral analysis is shown in fig.1.a tetrahedral mesh element is used for the meshing to improve the mesh quality and it also improves closeness of the result.The size of tetrahedral mesh element is kept medeum.Fig.1.b shows boundary condition applied on the pressure vessel i.e on fixed saddle supportas shown in yellow shaded part in fig.1.b keeping displacement in x,y and z axis is 0. and pressure of 8*105 Pa. is applied on the all inner faces of the pressure vessel. |
 |
| It is observed that the maximum deformation is 0.0291mm occurs at cylindrical partof the hemispherical head pressure vessel as shown in fig 2.aand fig 2.b shows that the von-misses stresses occurs in both shell and heads is 39.19 N/mm2 and 15.67 N/mm2 respectively . From the stress distribution fig 2.b it is observed that the maximumvon-misses stresses is developed atthenozzle and the value is 70.55 N/mm2. |
 |
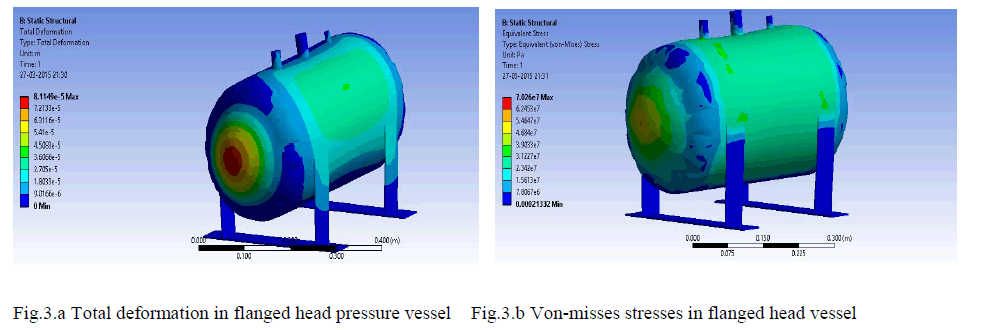
| It is observed that the maximum deformation is 0.0811mm occurs at head of the flanged head pressure vesselas shown in fig 3.a and fig 3.b shows that the von-misses stresses occurs in both shell and heads is 31.19 N/mm2 and 46.84N/mm2 respectively . From the stress distribution fig 3.b it is observed that the maximumvon-misses stresses is developed atthenozzle and the value is 70.26 N/mm |
 |
| It is observed that the maximum deformation is 0.0719mm occurs at head of the elliptical head pressure vesselas shown in fig 4.a and fig 4.b shows that the von-misses stresses occurs in both shell and heads is 33.05 N/mm2 and 45.04 N/mm2 respectively . From the stress distribution fig 4.b it is observed that the maximumvon-misses stresses is developed atthenozzle and the value is 67.55N/mm2. |
 |
| It is observed that the maximum deformation is 2.8 mm occurs at head of the flat head pressure vesselas shown in fig 5.a and fig 5.b shows that the von-misses stresses occurs in both shell and heads is 443 N/mm2 and 665 N/mm2 respectively. |
 |
| It is observed that the maximum deformation is 0.0296mm occurs at head of the elliptical head pressure vessel as shown in fig 6.a and fig 6.b shows that the von-misses stresses occurs in both shell and heads is 41.01 N/mm2 and 49.21 N/mm2 respectively . From the stress distribution fig 6.b it is observed that the maximumvon-misses stresses is developed atthenozzle and the value is 73.82 N/mm2. |
V. RESULTS AND DISCUSSION |
| With the help of Finite element analysis we can study the actual stress distributions in the different components of pressure vessel and the actual behaviour of pressure vessel. |
 |
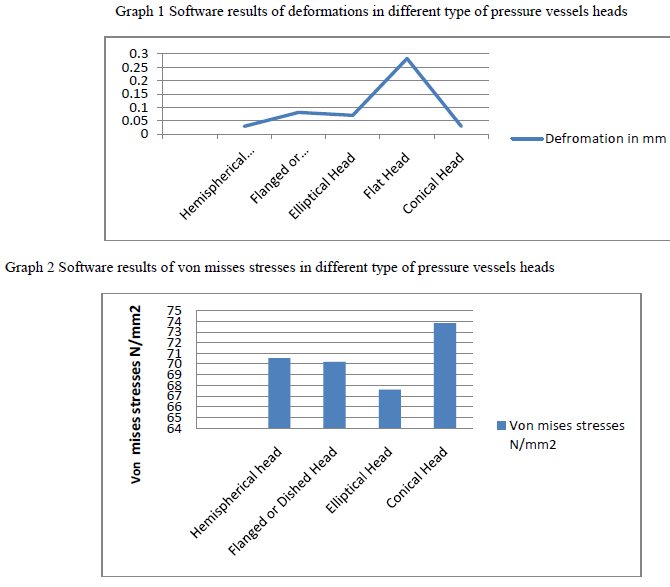
| Table 2 shows the variations in the deformation and von mises stresses in different type of pressure vessel heads and its location is also changes.From the software results maximum von misses stresses are induced flat head pressure vessel and is less in elliptical head pressure vessel. So the elliptical head pressure vessel design is safe based on the strength and rigidity criteria. |
 |
| Five different end connection sub-structured models were analysed with same internal pressure of 8*105 Pa and same volume the results for end connection sub-structured models were analysed |
VI. CONCLUSION |
| Results shows that the end connection with hemispherical shape in the least stresses when compared to other models while due to restrictions of the cost of material, and optimization in demand via industry, the use of ellipsoidal shape can be made with the increased thickness of the end connection for same level of stresses. The results also shows that without varying the thickness of elliptical end connection i.e. with same thickness the results of stresses can be considered to lie in a safe zone and can be used for the safe working of the vessel. Third type of model analysed was flanged or dished end type model where it was found the capability of undertaking pressure force is least and thus the stresses exceeds the limit of ASME standard for the material under the same loads and boundary conditions. The next model is conical end type of model where it was found that exceeds the limit of stresses as per ASME standard. |
References |
|