International Journal of Advanced Research in Electrical, Electronics and Instrumentation Engineering
ISSN ONLINE(2278-8875) PRINT (2320-3765)
ISSN ONLINE(2278-8875) PRINT (2320-3765)
K. Radhakrishnan1, Noble Jose2, Sanjay S G3, Thomas Cherian4, Vishnu K R5
|
| Related article at Pubmed, Scholar Google |
Visit for more related articles at International Journal of Advanced Research in Electrical, Electronics and Instrumentation Engineering
The purpose of this paper isto explain the design of an ATmega16[1] microcontroller based egg incubator system which is able to automatically maintain the environment which is optimum for embryo growth. The system has a temperature sensor which is able to monitor the temperature inside and outside the incubator and this data is sent to a microcontroller. The microcontroller, with the help of relays controls an incandescent lamp and anair circulating fan to maintain the egg temperature from 37 to 38.5°C. In addition, an LCD display is used to display the temperature inside and outside the incubator. The microcontroller also has a user-programmed timer to control a gear motor for tilting the eggholder
Keywords |
| EggIncubator, Microcontroller, Temperature sensor, ATmega16 |
INTRODUCTION |
| An incubator is a device simulating avian incubation by keeping eggs warm and in the correct humidity, and if needed to turn them, to hatch them. Modern incubators are electrically heated with a thermostat. The temperature within an incubator must be precisely maintained within certain limits for optimum growth of the egg. Also the egg has to be periodically tilted every four hours to avoid the setting of the yolk. |
| There are two types of incubators: |
| 1. Still Air Incubators |
| 2. Circulating Air Incubators |
| In still air incubators the temperature has to be precisely maintained at 38.9°C. Circulating air incubators have fans for air circulation, and in such incubators the temperature has to lie within the range from 37 to 38.5° C. For this purpose an incandescent lamp is turned on to heat the air, and the heated air is circulated using a fan. Once the temperature exceeds the maximum range the lamp is turned off and remains in that state till the temperature reaches the minimum. |
TEMPERATURE SENSOR STAGE |
A. Temperature Sensor - LM 35 |
| The LM35[2] series are precision integrated-circuit temperature sensors, whose output voltage is linearly proportional to the Celsius (Centigrade) temperature. The LM35 thus has an advantage over linear temperature sensors calibrated in Ãâ¹ÃÅ¡ Kelvin, as the user is not required to subtract a large constant voltage from its output to obtain convenient Centigrade scaling. The LM35 does not require any external calibration or trimming to provide typical accuracies of ±0.25Ãâ¹ÃÅ¡C at room temperature and ±0.75Ãâ¹ÃÅ¡C over a full −55 to +150Ãâ¹ÃÅ¡C temperature range. Low cost is assured by trimming and calibration at the wafer level. |
| The LM35’s low output impedance, linear output, and precise inherent calibration make interfacing to readout or control circuitry especially easy. It can be used with single power supplies, or with plus and minus supplies. As it draws only 60 μA from its supply, it has very low self-heating, less than 0.1Ãâ¹ÃÅ¡C in still air. The LM35 is rated to operate over a −55Ãâ¹ÃÅ¡ to +150Ãâ¹ÃÅ¡C temperature range. |
THE CONTROL STAGE |
A. Setting up the Controller |
| A 5 volt regulator circuit using the 3-terminal 7805 IC is used to supply the microcontroller ATMEGA16Aand the LCD. 7805 is a linear voltage regulator that can output a maximum current of 1A. Capacitors are provided at both input and output side of the regulator to suppress noise. |
B. Programmer |
| USBasp is a USB in-circuit programmer for Atmel AVR controllers. It simply consists of an ATMega88 or an ATMega8 and a couple of passive components. The programmer uses a firmware-only USB driver, which is obtained from [3], and no special USB controller is needed. On the computer side an in-system programming software called AVRDUDE – AVR Downloader Uploader – is used to download and upload the on-chip memories of Atmel’s AVR microcontrollers. It can program the Flash and EEPROM, and where supported by the serial programming protocol, it can program fuse and lock bits. |
C. Library and Compiler |
| The avr-libc package provides a subset of the standard C library for Atmel AV-R 8-bit RISC microcontrollers. In addition, the library provides the basic startup code needed by most applications. The compiler used is the GNU C compiler for AVR. All the above mentioned programs – avrdude, avr-libc and the gcc-avr are available as a suite of executable, open source software called WinAVR from [3].In addition user defined libraries “lcdlib” and "adc10bit" are used. |
D. Temperature Control Circuit |
| The temperature control circuit consists of the following components: |
| 1) Relay – 5 Volt: The temperature control circuit consists of two relays controlled by the microcontroller. The first relay is used for switching the incandescent lamp to a 230 V supply and a circulating fan to a 12 V supply. The second relay is used for switching the gear motor for operating the egg turning mechanism. The relay is triggered using a 2N2222 npn transistor and the microcontroller |
| 2) Incandescent Lamp: A 60W lamp is used for heating the air inside the incubator. The lamp is turned on when the temperature inside the incubator reaches below 37° C and is turned off when it exceeds 38.5° C using a relay |
| 3) Circulating Fan: The circulating fan is also triggered using a 5 V relay and is turned on at the same time as the incandescent lamp. It is used for the purpose of circulating the heated air uniformly around the chamber. |
| 4) Gear Motor:A gear motor is used for operating the egg turning mechanism. The gear motor is switched by a 5V relay and it rotates an elliptical cam connected to the egg holder. A spring is used to return the holder to its initial position. |
THE CONTROL STAGE |
A. The ADC of Atmega16A |
| The ATmega16A contains an internal 8-channel 10-bit ADC. The reference voltage for the ADC can be chosen from the following three – voltage at AVCC pin, internal 2.56V reference, voltage at pin AREF. Here, an external 5V at AVCC pin is used as the reference. The input and output voltages are read through channels ADC0 and ADC1 respectively. The value obtained after conversion is multiplied by suitable constants and is displayed on the LCD. |
B. The LCD Display |
| The display used is a 16x2 character LCD display with HD44780U dot-matrix liquid crystal display driver and controller. The LCD is wired in 8-bit mode. The data pins of the LCD are connected to PORTB of ATmega16A and the RS, R/W and E pins of LCD are respectively connected to PD0, PD1 and PD2. |
WORKING AND CIRCUIT DIAGRAM |
| Once the ATMEGA 16A microcontroller is turned on, it initializes the LCD using the user-defined library ‘lcdlib’ and also pins 33-40 function as a 10 bit analog to digital converter using the library ‘adc10bit’. The LCD is initialized so as to display the internal and external temperature in its two rows with the accuracy of two decimal places. The LM 35 temperature sensors, one placed near the egg and the other external to the incubator, are given the proper supply and the middle pin of the LM35 ic returns the voltage equivalent of the temperature to the adc. The adc converts the voltage from the two LM35 ics (10mV = 1°C) and displays both the egg and external temperature on the LCD. |
 |
| Fig. 1 Block Diagram |
| Since the optimum temperature for egg incubation is between 37 and 38.5°C, the microcontroller constantly check the temperature returned from the LM35 temperature sensors. For this 1000 samples of the adc are taken and their average is computed. The temperature is computed to two decimal places using mathematical operations and a suitable correction factor is applied to rectify an error due to the external reference voltage. If the value of temperature lies below the optimum range, a high voltage is given through pin 23 of the microcontroller to the base of transistor T1 to trigger the relay. The triggering of the relay turns on the incandescent lamp through a 230V supply and the circulating fan through a 12V supply. The heat from the incandescent lamp increases the temperature of the air and this is circulated inside the incubator using the fan. This process continues till the temperature reaches above 38.5°C. Once this range is exceeded the relay is turned off and the incandescent lamp and the fan get turned off, till the temperature goes below the lower limit again. Two LEDs are used to indicate if the temperature is within the desired range and if the bulb is on or off. An additional LED is used for fault detection, in case the temperature goes below 32°C or above 42°C. |
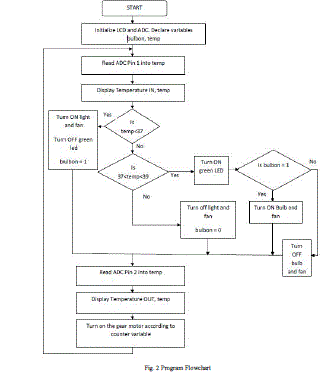 |
| Fig. 2 Program Flowchart |
| The egg turning mechanism is implemented using a user-defined counter in the microcontroller to tilt the egg at regular intervals. For this pin 21 of port D is used to trigger a relay to switch on the gear motor. Once the gear motor is turned on it rotates an elliptical pivot on which the egg holder is connected, making it tilt to and fro. This provides sufficient movement for the egg, to prevent solidification of the yolk. A spring is used to return the holder to its initial position after the gear motor is turned off. |
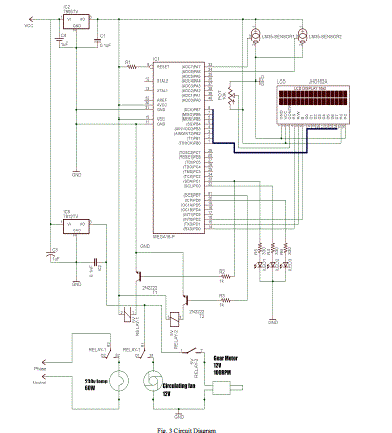 |
| Fig. 3 Circuit Diagram |
CONCLUSION |
| The paper demonstrates a design for implementing a microcontroller based egg incubator. The precise values of temperature would be displayed on the LCD screen. With the working of the two relays and control of the incandescent lamp, fans and turning mechanism an efficient design of an incubator is implemented. |
 |
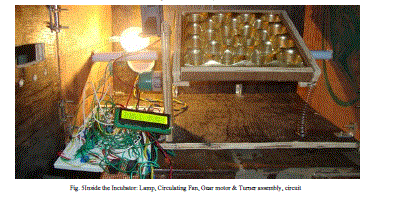 |
| Fig. 5Inside the Incubator: Lamp, Circulating Fan, Gear motor & Turner assembly, circuit |
References |
|