International Journal of Advanced Research in Electrical, Electronics and Instrumentation Engineering
ISSN ONLINE(2278-8875) PRINT (2320-3765)
ISSN ONLINE(2278-8875) PRINT (2320-3765)
Annie P. Oommen1, Rahul A P2, Pranav V3, Ponni S4, Renjith Nadeshan5
|
| Related article at Pubmed, Scholar Google |
Visit for more related articles at International Journal of Advanced Research in Electrical, Electronics and Instrumentation Engineering
The purpose of this project is to create a micro-controller based Digital Code Lock that serves the purpose of security. The microcontroller based Digital Code Lock is an access control system that allows only authorized persons to access a restricted area. Security is a prime concern in our day-today life. Everyone wants to be as much secure as possible. An access control for doors forms a vital link in a security chain. The system comprises of a push button keypad connected to the 8 bit microcontroller ATmega328P. The system will allow you to preset a password. The lock will open if and only if the entered password matches the preset one. If the entered password is wrong a buzzer will be activated.
Keywords |
| Digital Code Lock, Microcontroller, LCD Display Interface |
INTRODUCTION |
| “Password Based Access Control System using Microcontroller” is used in the places where we need more security. It can also used to secure doors, cell phones, computers and other equipments. |
| The system comprises of a push button keypad connected to the 8 bit microcontroller ATmega328P. This is one of the popular Microcontrollers. It has only 20 pins and there are 15 input/output lines. The microcontroller has a flash memory of 32Kbytes, 1 Kbyte EEPROM and 2 Kbytes RAM. The microcontroller continuously monitors the keypad and if somebody enters a password it will check the entered password with the password stored in the memory and if they match then the microcontroller will switch on the corresponding device. |
| The system will allow access to the person who knows the password and it will not allow access to unauthorized people. The system has an alarm to thwart the people who may try to break the protection barrier. |
WORKING AND CIRCUIT DIAGRAM |
| The authentication method used here is a four digit numeric code which is entered through the keypad. The code entered this way is then compared to the password stored in memory. The microcontroller continuously monitors the keypad for a match with the stored password. As and when there is a match the output line is enabled which can then be used to trigger an LED. A buzzer is triggered if the entered code doesn’t match the stored password, as an audio indication that the lock has not been opened. An LCD display is also used to display whether the entered password is correct or not. |
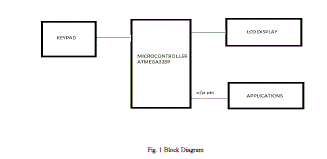 |
| Fig. 1 Block Diagram |
| When the circuit is switched on a message on the LCD prompts us to ‘enter password’. The entered code is read from the keypad and checked against the original password stored in the microcontroller memory. If it is a match an LED is switched ON and if it is not a match, a buzzer is triggered and a message on the LCD prompts us to re-enter the password. The whole procedure is then repeated. |
 |
| Fig 2.Program Flow Chart |
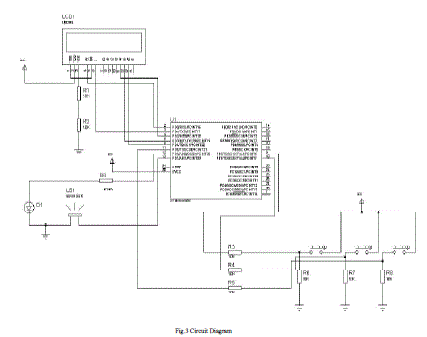
| The Main Part of the above Circuit diagrams is the Microcontroller ATmega328P. The push button keypad is the input device wherein one button acts as an up button(number gets incremented with each press 1,2,3,etc) , second button acts as a down button and the third one is the set button(sets a digit and moves to the next digit). The Microcontroller asks the user to define afour-digit password through the Keypad. Once a password is set and later somebody tries to unlock the device, the Microcontroller reads the keypad entry and compares the four digit password with the predefined password and if it is equal then the LED connected to the lock output key glows and if we enter a wrong password an alarm will be switched ON. |
| The Password is stored in the RAM and the password can be changed using the same keypad. The power supply section is very important. It should deliver constant output regulated power supply for successful working of the project. Regulated 5 volt supply is taken through the USB port of a laptop/desktop. |
 |
CONCLUSION |
| The digital code lock performed as expected. We were able to implement all the functions specified in our proposal. The biggest hurdle we had to overcome with this project was interfacing the micro controller with the hardware components. We feel that this digital code lock is very marketable because it is easy to use, comparatively inexpensive due to low power consumption, and highly reliable. This digital code lock is therefore particularly useful in applications such as door locks and equipment locks. |
| This simple digital code lock using microcontroller can be enhanced by incorporating new means of authentication. Most prevalent form of digital lock is that using a numerical code for authentication; the correct code must be entered in order for the lock to deactivate. Such locks typically provide a keypad, and some feature an audible response to each press. Combination lengths are usually between 4 and 6 digits long. |
| Another means of authenticating users is to require them to scan or "swipe" a security token such as a smart card or similar, or to interact a token with the lock. |
| As biometrics become more and more prominent as a recognized means of positive identification, their use in security systems increases. Some new digital locks take advantage of technologies such as fingerprint scanning, retinal scanning and iris scanning, and voiceprint identification to authenticate users. |
| Radio frequency identification(RFID) is the use of an object (typically referred to as an RFID tag) applied to or incorporated into a product, animal, or person for the purpose of identification and tracking using radio waves. Some tags can be read from several meters away and beyond the line of sight of the reader. This technology is also used in modern digital locks. |
ACKNOWLEDGEMENTS |
| We extend our sincere thanks to Prof. Radhakrishnan K, Head of the department for providing us with the guidance and facilities for the mini project. We also thank our faculty advisor Prof. Elizabeth Sebastian for her valuable guidance. We express our sincere gratitude to mini project coordinator Mr. Eldhose K A , staff in charge, for their cooperation and guidance for preparing and presenting this mini project. We also extend our sincere thanks to all other faculty members of Electrical and Electronics Department and our friends for their support and encouragement. |
References |
|