ISSN ONLINE(2319-8753)PRINT(2347-6710)
ISSN ONLINE(2319-8753)PRINT(2347-6710)
Berkath Ali Khan C A1, Dr. Anil Kumar C 2, Dr. Suresh P M 3
|
| Related article at Pubmed, Scholar Google |
Visit for more related articles at International Journal of Innovative Research in Science, Engineering and Technology
Plasma sprayed coatings are widely used as wear resistant coatings on a variety of metallic substrates. Alumina (Al2O3), Titania (TiO2) and Alumina-Titania (Al2O3+40%TiO2) ceramic coatings with different coating thicknesses of 100μm, 150μm and 200μm are deposited on Al-6082T6 substrate by Plasma Spray Technique. Microstructural, Tribological Properties and Surface Roughness of the coated specimens have been studied for Aluminium (Al-6082T6) and Coated Al-6082T6. NiCrAl is used as a bond coat material to promote coating adhesion. Dry wear test was performed for different sliding distance of 1000m, 2000m, and 3000m at a constant load of 10N by using a Pin-on-Disc. The results obtained from the above work showed that, the Alumina coated specimens is having excellent wear property when compared to Titania and Alumina-Titania coating materials. The SEM of the worn surfaces of coated specimen shows better results than that of the Al-6082T6.
Keywords |
| Ceramic coatings, Aluminium 6082 alloy, Alumina (Al2O3), Titania (TiO2),Thermal Spray Techniques, Surface Roughness |
INTRODUCTION |
| In industrial applications the mechanical components have to operate under severe working conditions such as high Load, Speed or Temperature and Chemical environment. Thus their surface modification is necessary in order to protect them from various types of degradation. Aluminium alloys have been considered to be some of the most useful and versatile materials because of their metallurgical characteristics such as High Strength-to-Weight ratio and High Thermal Conductivity. They are also easy to shape and relatively inexpensive. However, the low hardness results in poor tribological characteristics and prevents their wider applications, especially in the situations where a hard surface is needed. Ceramic coatings produced by Thermal Spray Techniques are widely used for a range of industrial applications to confer wear and erosion resistance, thermal insulation and corrosion protection. Thermal spraying belongs to a class of semi-molten state coating technique. To improve the wear resistance, many techniques, such as Metal-Matrix Composites, Plasma Spraying, Thermal Spraying and Hard Anodizing have been explored. Plasma Spraying is one such technique that involves projection of selected powder particles into the area of high thermal density (Plasma gun), where they are melted, accelerated and directed on to the substrate surface. Coatings are formed by the immediate solidification of the molten droplets on the substrate surface of lower temperature where they form splats [1-6]. Plasma sprayed Al2O3-TiO2 is used as a wear resistant coating in Steel Piston Rings, Ship Engine Valves, Water Pumps, Textile and Printing Industries [7-11] |
RELATED WORK |
| Alumina coatings were experimented on CK45 tool steel and Aluminium alloy 2030-O-T3 substrates in the form of discs by plasma-spray coating technique. Surface integrity evaluation like micro-hardness, surface roughness and microstructure of the coated samples were observed. Wear test was performed on a pin-on-disc apparatus. Finally, it was concluded that the micro-hardness of the coating increases with the increase of arc current and is more profound for aluminium substrates. Also the average coefficient of friction was lower for Aluminium substrates than for Steel [12].Al2O3-13%TiO2 coatings were deposited on stainless steel substrate from conventional and nanostructured powders using Atmospheric Plasma Spraying (APS) technique. Coating micro-hardness as well as tribological behaviour was determined. The wear resistance of conventional coatings was shown to be lower than that of nanostructured coatings as a sequence of Ti segregation [13].WC-Co Ceramic coatings were deposited on Ti6Al4V substrate with different thicknesses (250μm, 350μm and 450μm) by the Detonation Spray (DS) while the thickness of the NiCrAlY bond coat (200μm) deposited by High Velocity Oxy Fuel (HVOF), stayed the same. Mechanical properties like hardness and wear resistance were found for both substrate and duplex coatings. The substrate was subjected to a severe wear characterized by plastic deformation, shearing and abrasion. The wear track of the duplex coated sample indicates the evidence of limited micro-cutting but a significant brittle fracture of the coating[14]. |
EXPERIMENTAL WORK |
MATERIALS AND COATING DEPOSITION |
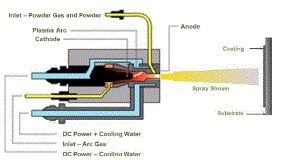
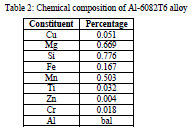
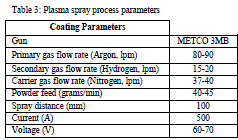
| Aluminium alloy (Al-6082T6) used as the substrate. Al2O3 and TiO2 powders are used as coating materials and premixed to form three different compositions shown in Table 1. The chemical composition of the substrate is shown in Table 2. In the present investigation NiCrAl bond coat of 10-20μm was deposited to promote the best attainable adhesion between coating and substrate and the top coat with 100μm, 150μm and 200μm thick deposited by plasma spray process [12] shown in Figure 1. Prior to deposition the substrate surface was cleaned with acetone. The plasma spray process parameters are listed in Table 3. |
 |
 |
CHARACTERISATION OF COATINGS |
| Microstructural characterisation studies were conducted on Al2O3, TiO2 and Al2O3 +40%TiO2 coated samples by using Scanning Electron Microscope (SEM) and X-ray analyser (EDX) is used to study the microstructure of the substrate. |
MICRO-HARDNESS |
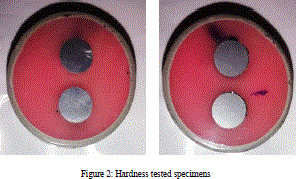
| Hardness measurement is done to find micro-hardness [14] of substrate and coated material. Micro-hardness test was performed on a cross section of coatings with a load of 250 g and dwell period of 10 sec and average of three reading are tabulated in Table 5 and the tested specimens are as shown in Figure 2. |
SURFACE ROUGHNESS MEASUREMENTS |
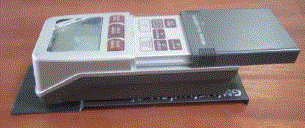
| Before conducting the wear tests the surface roughness of pins were measured. Surface roughness was measured using a Talysurf instrument (Model: SJ-301) as shown in Figure 3. The cut-off length was 0.8 mm, an average of five reading is reported in Table 4. |
 |
WEAR TESTING |
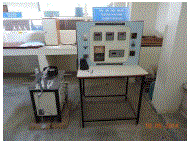
| The dry sliding wear tests conducted on a Pin-on-Disc wear testing machine as shown in Figure 4 according to ASTM G99-04 standards [15]. The cylindrical pins of 6mm diameter and 30mm length coated with oxides of different coating thickness were used as test material. Hardened ground steel was used as the counter face material. The wear tests were carried out at a load of 10N for a sliding speed of 265rpm, 530rpm and 795rpm, over a sliding distance of 1000m, 2000m and 3000m respectively. Weight losses of the specimens were measured by using an electronic weighing balance. The morphology of wear scars was observed by SEM in order to identify the microstructural behaviour and wear mechanism for both uncoated and coated samples. |
 |
EXPERIMENTAL RESULTS |
CHARACTERISATION OF COATINGS |
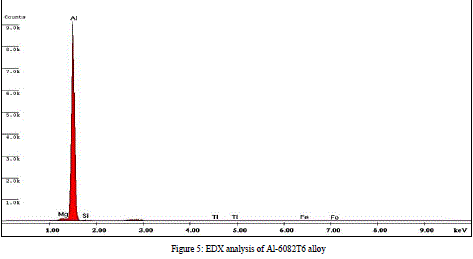
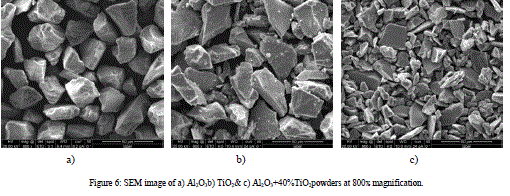
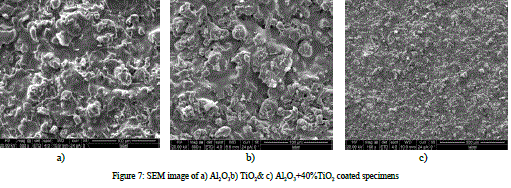
| The Energy Dispersive X-ray Spectroscopy (EDX) analysis of the aluminium substrate is shown in Figure 5 which indicates the presence of main alloyingelementslikeAluminium, Magnesium and Silicon. Figure 6 shows theSEM images of powder samples at 800x magnification and the SEM images of the coated specimens before wear test on Al-6082T6 substrate are shown in Figure 7 i.e., Al2O3, TiO2 and Al2O3+40%TiO2 with a little porosity present on the surface of the sample. |
 |
 |
SURFACE ROUGHNESS MEASUREMENT |
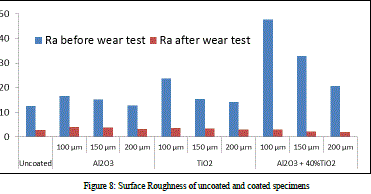
| Figure 8 shows the values recorded both for coated and uncoated specimens which are showing higher Ra values in comparison with the specimen surface after wear test. Uncoated material has got lesser Ra values than with that of coated materials. Observations for coated specimens show that coating material particles along with the bond surface have created a rough surface area. After the conduction of wear test, the coating layer either eroded or abraded to create a surface wherein which less Ra has been recorded. |
 |
MICRO-HARDNESS MEASUREMENTS |
| The micro-hardness values for different coating powders are listed in Table 5. From the table it is clear that Titania is having the highest hardness value when compared to other combinations. |
 |
WEAR ANALYSIS |
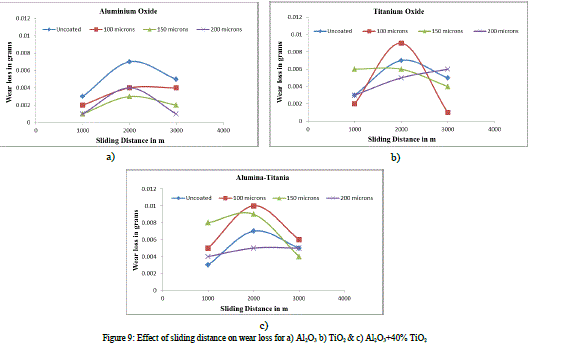
| A Pin-on-Disc wear test was performed according to ASTM G99-04 standards to simulate sliding wear of the coatings. Figures 9 shows the effect of sliding distances on wear loss for different powders. Figures 10 shows the effect of sliding distances on wear loss for different coating thicknesses when compared to Aluminium (Al-6082T6). The mass loss trend is almost similar for all the coating thicknesses but the mass loss increases suddenly up to a sliding distance of 2000m. After this initial wear there is a decrease of wear loss at a sliding distance of 3000m which is due to the strain hardening in the disc material and coated samples, thereby reducing the mass loss with the increase in sliding distance. |
 |
 |
| Figure 11a shows the SEM image of the Al-6082T6 substrate after wear test and Figure 11b, 11c & 11d shows the SEM images of coated samples with coating thickness of 100μm, 150μm and 200μm after wear test under a load of 10N at a sliding distance of 3000m. Figure 11a shows that the substrate has undergone severe wear characterised by shearing and plastic deformation. It is also observed that the substrate surface is severely weared which causes roughening and the formations of grain like debris. In addition, the parallel grooves and scratches are observed in wear track of the substrate [16]. The coated samples show less plastic deformation within the wear track (in figure 11 to 13). The wear track shows evidence of limited micro-cutting but a significant brittle fracture of the coatings. |
 |
 |
CONCLUSION |
| Alumina, Titania and Alumina-Titania coatings are deposited on metal substrates with an intermediate bond coat of NiCrAl by atmospheric plasma spraying and these bond coatings exhibit desirable coating characteristics like adhesion strength.The Alumina coated specimens showed excellent wear property when compared to other coating materials.The SEM of the worn surfaces of coated specimen shows that these surfaces are much rougher than that of bare aluminium which can withstand maximum wear than that of the actual Al-6082T6. This indicates an abrasive wear mechanism which is essentially a result of coated particles exposed on the worn surface.By this we can conclude that the Thermal Barrier Coating decrease the wear than that of the parent metal.No direct relationship between hardness and tribological characteristics of the coatings has been established. |
References |
|