Keywords
|
| porting android, porting kernel, compile kernel, compile android |
INTRODUCTION
|
| First android is open source. Android has binder ipc, lowmemorykiller, pmem driver etc which is used for mobile platform (Arm based platform).This feature increasing the performance of arm based device. Android also provide tools for creating apps. Also user uses thousand of application from android market apps. Android easily porting on any arm based devices with minimum changes. So android is better than the other Embedded OS. So, today Most of the people uses devices like mobiles, tablets which has android OS. |
| The term port means portare and its meaning is "to carry" when code is not compatible with specific architecture, the code must be "carried" to the new platform without major change. Here we define steps for android porting on any arm base devices. We will take a Linux 2.6.32 kernel for kernel porting and for android we will take a android 2.3.7(gingerbread).we will take a d2plug which is Marvell developing board for understanding whole porting process. |
PREREQUIREMENTS FOR PORTING
|
| A. First Download the kernel from www.kernel.org. it is generic for all platform like omap.dove etc. For d2plug, download the kernel from www.plugcomputer.org/downloads/d2plug/ which has a already d2plug support and don?t need to more changes. |
| B. Download the android Source code from http://source.android.com/source/downloading.html . |
| C. Extract Android source code. |
| D. Make kernel folder in android directory and extract kernel in kernel folder like <android directory>/kernel. |
PORTING
|
| Android porting is divided into two steps: |
| A) Kernel porting |
| 1) First understand basic information of kernel and its important files. |
| 2) Add the android features in kernel. |
| 3) Compile the kernel. |
| B) Android porting |
| 1) System requirement for build android. |
| 2) Add new platform support in android. |
| 3) Compile android. |
| 4) Booting from USB. |
| A) Kernel Porting |
| 1) Basic information of kernel: |
| The starting point here is that you have set up your kernel source tree with the ARM patches. This description covers the 2.6 series kernels, specifically 2.6.32. The ARM-specific files are in linux/arch/arm (code), and linux/include/asm-arm (header files). Within the ARM-specific directories your new or changed files go in appropriate linux/arch/arm/mach-dove and linux/include/asm-arm/arch-arm/mach-dove and dove directories e.g. linux/arch/arm/mach-dove and linux/include/asmarm/ arch-dove. After configuration your headers directory linux/include/asm-arm/arch-dove appears as linux/include/asmarm/ arch so that the correct machine header files can be included by using this path. |
| The other directories in linux/arch/arm/ contain the generic ARM code. |
| • kernel - core kernel code. |
| • mm - memory management code. |
| • lib - ARM-specific or optimised internal library functions (backtrace, memcpy, io functions, bit-twiddling etc). |
| • nwfpe and fastfpe - two different floating-point implementations. |
| • boot - the directory in which the final compiled kernel is left and contains stuff for generating compressed kernels. |
| • tools - has scripts for auto generating files, such as mach-types (see section Registering a Machine ID) . |
| • configs - contains the default configuration files for each machine. |
| The non machine-specific directories in linux/include/asm-arm are: |
| • arch - the link to the configured machine headers sub-directory arch-XXX. |
| • hardware - headers for ARM-specific companion chips or devices. |
| • mach - generic interface definitions for things used by many machines (irq, dma, pci) and the machine description macros. |
| • Registering a Machine Id: |
| Each device is identified in the kernel tree by a machine ID. These are allocated by the kernel maintainer to keep the huge number of ARM device variants manageable in the source trees. |
| The first thing you need to do in your port is register your new machine with the kernel maintainer to get a number for it. This is not actually necessary to begin work, but you'll need to do this eventually so it's best to do it at the beginning and not have to change your machine name or ID later. |
| You register a new architecture by mailing <rmk@arm.linux.org.uk>, or filling in an on-line form at http://www.armlinux.org.uk/developer/machines/. |
| machine_is_xxx CONFIG_xxx MACH_TYPE_xxx machine_ID |
| dove_d2plug MACH_DOVE_D2PLUG DOVE_D2PLUG 3245 |
| Then you need to add the info to linux/arch/arm/tools/mach-types with a line like this or go to: |
| http://www.arm.linux.org.uk/developer/machines/ where you can download the latest version of mach-types. |
| • Def-config file: |
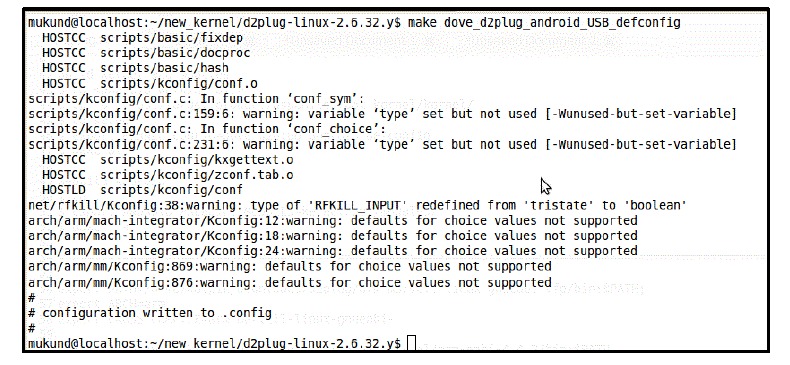
| Add a new config file in linux/arch/arm/configs/ named <machine-name>, containing the default configuration options for your machine or you can select specification as per board using “make menuconfig” .When you will fire “make <machinename>_ defconfig” e.g. “make dove_d2plug_android__USB_defconfig” command, it is copied out of linux/arch/arm/defconfigs/ to linux/.config. |
| Here we list the most important files, and describe their purpose and the sort of things you should put in them. It looks daunting to start with but most of what is required is just a matter of filling in the numbers appropriate to your hardware. Now that so many different machines are supported it is rare that you have to write much new code - nearly everything can be taken from a suitable donor machine. This is easier to do if you know which machines have a similar architecture to your own . |
| • arch/arm/Makefile: |
| Insert the following to this file (replace dove with your machine name): |
| For D2plug: |
| • arch/arm/kernel/entry-armv.S: |
| Machine-specific IRQ functions. You provide the assembly macros disable_fiq, get_irqnr_and_base, and irq_prio_table here. disable_fiq and irq_prio_table is usually empty, but get_irqnr_and_base must be implemented carefully: you should use the zero flag to indicate the presence of interrupts,and put the correct IRQ number in irqnr. |
| • arch/arm/kernel/debug.S: |
| These are the low-level debug functions, which talk to a serial port without relying on interrupts or any other kernel functionality. You'll need to use these functions if it won't boot. The functions you need to implement are addruart, senduart and waituart, using ARM assembly. They give you the address of the debug UART, send a byte to the debug UART, and wait for the debug UART, respectively. |
| • arch/arm/mach-dove/Makefile: |
| You need to add a target for your machine, listing the object files in this directory. That will be at least the following: obj-$(CONFIG_MACH_DOVE_D2PLUG) += dove-d2plug-setup.o |
| • arch/arm/mach-dove/dove-d2plug-setup.c: |
| The setup for your machine is done with a set of macros, starting with MACHINE_START. The parameters you give are filled in to a data structure machine_desc describing the machine. One of the items is the fixup function which, if specified, will be called to fill in or adjust entries dynamically at boot time. This is useful for detecting optional items needed at boot-time (e.g.VRAM in a Risc PC). |
| For Example: |
| 2) Add Android Configuration in defconfig : |
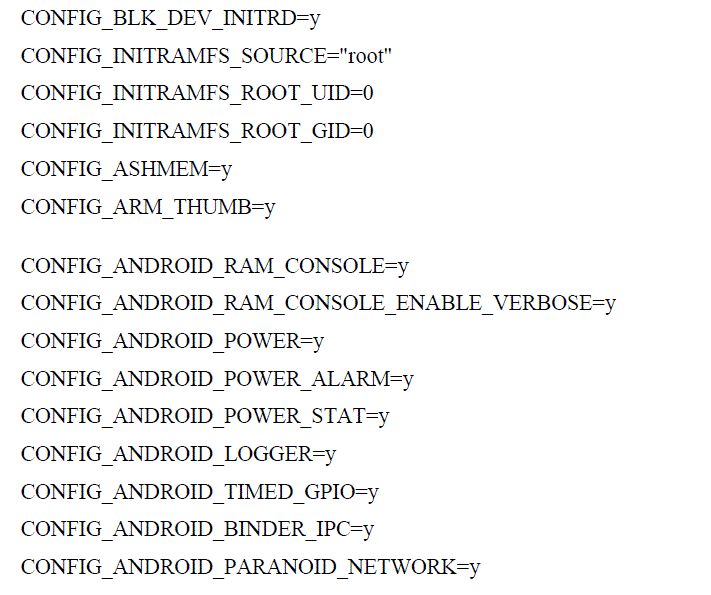
| In kernel, Android drivers is in driver/staging folder like lowmemory killer,binder etc.For d2plug Android driver is in driver/staging folder, just add in d2plug defconfig shown in fig. 4. |
| CONFIG_BLK_DEV_INITRD=y |
| CONFIG_INITRAMFS_SOURCE="root" |
| CONFIG_INITRAMFS_ROOT_UID=0 |
| CONFIG_INITRAMFS_ROOT_GID=0 |
| CONFIG_ASHMEM=y |
| CONFIG_ARM_THUMB=y |
| CONFIG_ANDROID_RAM_CONSOLE=y |
| CONFIG_ANDROID_RAM_CONSOLE_ENABLE_VERBOSE=y |
| CONFIG_ANDROID_POWER=y |
| CONFIG_ANDROID_POWER_ALARM=y |
| CONFIG_ANDROID_POWER_STAT=y |
| CONFIG_ANDROID_LOGGER=y |
| CONFIG_ANDROID_TIMED_GPIO=y |
| CONFIG_ANDROID_BINDER_IPC=y |
| CONFIG_ANDROID_PARANOID_NETWORK=y |
| 3) Compile Kernel: |
| • first set the toolchain path then set architecture and tool chain prefix . we use android toolchain which is in prebuilt folder. Then export a ARCH and CROSSCOMIPLE environment variable. Here we are using toolchain which is in <android_directory>/prebuilt folder because kernel and file system both are compile using same toolchain. |
| Set the environment in kernel directory and type command as shown in fig 5. |
| • When you will type “ make dove_d2plug_android__USB_defconfig” command in consol, its copy in .config file. |
| • Then finally type command “make uImage” for making uImage . |
| • After the compilation, uImage is generated which is in arch/arm/boot directory shown in fig. 8. |
| B. Android Porting: |
| 1) System Requirements: |
| • ARM Processor base development board |
| • Host PC with operating system Ubuntu 10.04 with minimum 12 GB free space. |
| Setup Ubuntu 10.04 for Android Compilation |
| Below for list of package are required to build android |
| 1. $ sudo apt-get install liblzo2-dev |
| 2. $ sudo apt-get install bison |
| 3. $ sudo apt-get install uuid-dev |
| 4. $ sudo apt-get install libncurses5-dev |
| 5. $ sudo apt-get install sun-java6-jdk |
| 6. $ sudo apt-get install libglib2.0-dev |
| 7. $ sudo apt-get install flex |
| 8. $ sudo apt-get install g++ |
| 9. $ sudo apt-get install libz-dev |
| 10. $ sudo apt-get install gperf |
| 11 .$ sudo apt-get install libx11-dev |
| Note: If we build Android Version below 2.3 we require java5-jdk So we refers all the above package exception sudo apt-get install sun-java6-jdk. And we refer sudo apt-get install sun-java5-jdk. |
| Below Snapshot of the downloaded directory of <android directory>. |
| Android has defined a framework to add a new platform in the source code. Any platform specific configuration can be added in the ~/<android directory>/devices directory. |
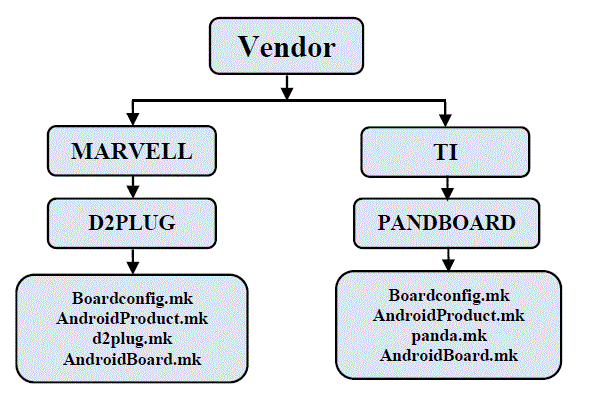
| Under devices directory vendor names are mentioned and each vendor can have different types of platforms. |
| 3) Add New Platform support in Android: |
| In below Figure, Marvell is the vendor name and d2plug is the platform for which android is to be built. Same as TI is vendor and panda board as platform. |
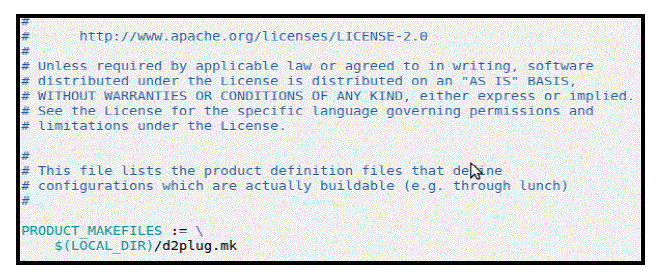
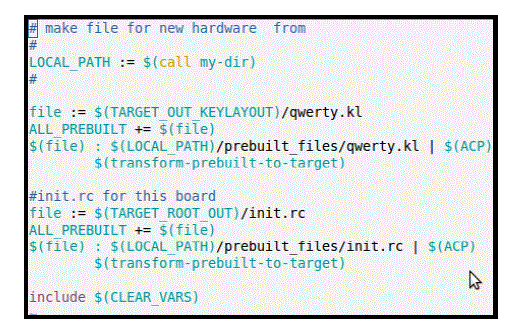
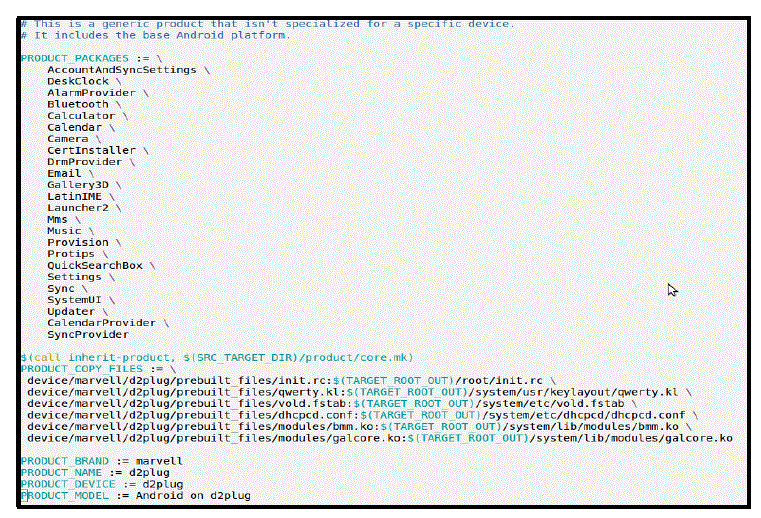
| Following files Boardconfig.mk AndroidProduct.mk product.mk and AndroidBoard.mk are add under ~/<android directory>/devices/<vendor>/<platform> directory. |
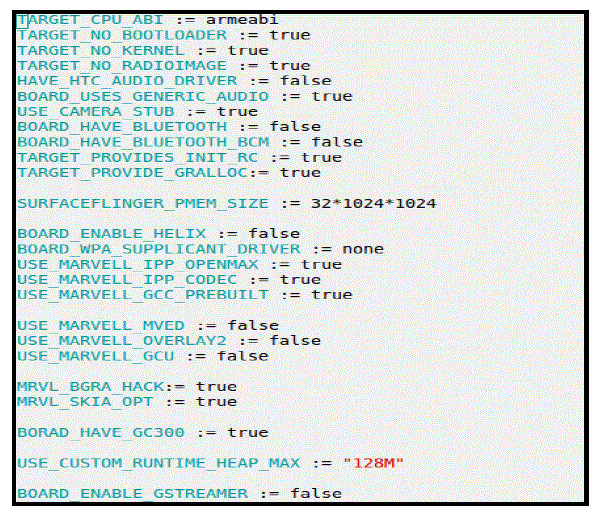
| For adding a files we list below snapshots for reference |
| • Boardconfig.mk |
| In this file we define the board configuration like which processor and also defined hardware component support like HDMI Bluetooth, Wi-Fi Ethernet etc. So we define that component in this file. |
| • AndroidProduct.mk |
| In this file we including <product>.mk file.In above snapshot we include d2plug.mk for our product. |
| • AndroidBoard.mk |
| In this file we define some hardware specific file like keyboard supported file for example above snapshot we add two specific file qwerty.kl and init.rc so final build image including this thing . In init.rc file we define which services are start on boot time or after boot for example Ethernet services is not require to start at boot time so we start this services after completion of booting process. |
| • d2plug.mk |
| In this file we define which application package are including build for our product. For example If we remove the Calculator application package in this file the final build images is without calculator application package in our product. |
| 4) Android Source Code Compilation: |
| To build android images: |
| $ cd ~/ <android directory> |
| $ . build/envsetup.sh |
| Above command is set environment of existing platform in source code. |
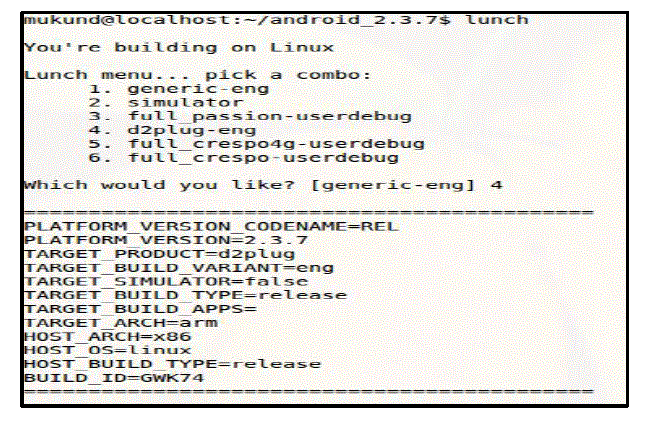
| $ lunch |
| Above command execute in console and select your product. For example above snapshot we select 4 for our product d2plug. Above command is list the existing product in the source code and also give the information about product name, target architecture , platform version and host architecture etc. |
| $ make -j40 |
| Above command will start to build android source code. |
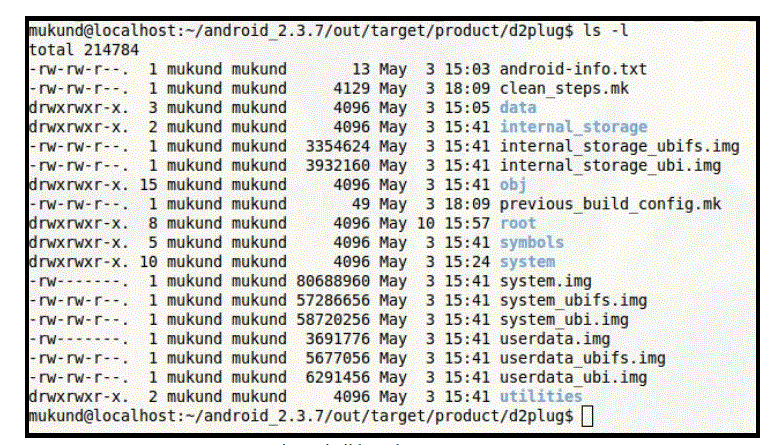
| After successful build source code the following result should be generated under <android directory>/out /target /product /<platform>. |
| system.img :- It is a partition image that will be mounted as / and thus contains all system binaries. userdata.img:- It is a partition image that can be mounted as /data and thus contains all application-specific and user-specific data. |
| • To Build Single Module in Android Repo: |
| If you build some of the defined functions or module in part of the <android directory>.Use the 'mm' or 'mmm' commands to do this. |
| The 'mm' command makes stuff in the current directory. |
| <android directory> <module directory path > mm |
| The „mmm? command, you specify a path of directory. |
| <android directory> mmm <module directory path> |
|
|
| The „make snod? command is use to rebuild system images to changes with current binaries |
| <android directory> make snod |
| Advantage of „make snod? command is to avoid the whole build process of latest system images with changes from android soruce code. |
| 5) Booting android from USB drive: |
| • Setup USB drive with two Partitions using GParted, FDISK or any disk Partition utility. |
| • Partition1 is size of 100MB and remaining space for partition2. |
| • Format Partition1 as FAT32 and Partition2 as EXT4. |
| • copy ~/<kernel directory>/arm/arm/boot/uImage in partition1 |
| • Copy ~/<android directory>/out/target/product/<platform>/root/* |
| ~/<android directory>/out/target/product/<platform>/data and |
| ~/<android directory>/out/target/product/<platform>/system folder in Partition2. |
CONCLUSION
|
| In this paper explain easily android porting on any arm based platform .Here understood the kernel architecture and its most important files, set environment variables, compile the kernel ,add new arm based platform support in android, compiling the Android, booting from USB . |
ACKNOWLEDGMENT
|
| We have taken efforts in this project. However, it would not have been possible without the kind support and help of many individuals and organizations. We would like to extend my sincere thanks to all of them. We highly indebted to Mr. Mukund Ubhadiya, Tech lead in PES division at e-Infochips for their guidance and constant supervision as well as for providing necessary information regarding the project & also for their support in completing the project. |
| |
Figures at a glance
|
 |
 |
 |
 |
 |
| Figure 1 |
Figure 2 |
Figure 3 |
Figure 4 |
Figure 5 |
 |
 |
 |
 |
 |
| Figure 6 |
Figure 7 |
Figure 8 |
Figure 9 |
Figure 10 |
 |
 |
 |
 |
 |
| Figure 11 |
Figure 12 |
Figure 13 |
Figure 14 |
Figure 15 |
 |
 |
| Figure 16 |
Figure 17 |
|
| |
References
|
- Wookey and Tak-Shing : Porting the Linux Kernel to a New ARM Platform in alphaone (volume 4,summer 2002).
- systique. : Android Porting Guide for Embedded Platforms (march-2009).
- http://www.plugcomputer.org/downloads/d2plug/.
- http://source.android.com/download/using-repo.
- KarimYaghmour.:Porting Android to New Hardware in android builder summit (14th April 2011).
|