ISSN ONLINE(2278-8875) PRINT (2320-3765)
ISSN ONLINE(2278-8875) PRINT (2320-3765)
R.Hegazy1, M.I.Mohamad2
|
| Related article at Pubmed, Scholar Google |
Visit for more related articles at International Journal of Advanced Research in Electrical, Electronics and Instrumentation Engineering
Sensitivity coefficients are essentially conversion factors that allow one to convert the units of an input quantity into the units of the measurand. Sensitivity coefficients are also, and more importantly, measures of how much change is produced in the measurand by changes in an input quantity. Mathematically, Sensitivity coefficients are obtained from partial derivatives of the model function with respect to the input quantities [1]. Many laboratories use the value of the sensitivity coefficient equals one for every input quantity without performing the partial derivatives. They use the value one just to express the uncertainty of the input quantity as a percentage which is not true. The aim of this work is to demonstrate the difference in the uncertainty values calculated by using the sensitivity coefficient by the partial differential equations and by using percentage values through examples in hardness and tension tests. The examples show high difference between the two methods.
Keywords |
| Uncertainty, Sensitivity coeffient,. |
INTRODUCTION |
| The purpose of measurement is to determine a value of a quantity of interest (the measurand). Examples of measurands include the hardness of a metal specimen, or the tensile strength, or the length of a metal bar .Notice that the objective of a measurement is to determine a value of the measurand, in other words, to sample one value out of a universe of possible values, since, in general, when one repeats a measurement many times, one will obtain many different answers. |
| This observed variability in the results of repeated measurements arises because influence quantities that can affect the measurement result are not held constant. In general, there are many influence quantities affecting a measurement result. Although it is impossible to identify all of them, the most significant can be identified and the magnitude of their effects on the measurement result can be estimated. Further, the way they impact the measurement result can, in many cases, be mathematically modeled. A statement of a measurement result is incomplete (perhaps even meaningless) without an accompanying statement of the estimated uncertainty of measurement The ISO Guide to the Expression of Uncertainty in Measurement (GUM 2003)[2] and the corresponding American National Standard ANSI/NCSL Z540-2-1997 provide the current international consensus method for estimating measurement uncertainty. It is equally applicable to calibration and test results and it forms the basis for accreditation requirements relating to measurement uncertainty estimation. |
| The aim of this work is to demonstrate the difference between the value of uncertainty using sensitivity coefficients for all influence factors which contribute the value of uncertainty and the value of uncertainty using percentage value for all factors considering them equally weighted and the same contribution of uncertainty budget. |
II. THEORETICAL BACKGROUND |
| The GUM 2011 [3] method supposes that a mathematical model is available or can be derived that describes the functional relationship between the measurand and the influence quantities. |
| In many instances of undertaking test measurements the functional relationship is relatively simple and often the test procedure provides the basis of a satisfactory model. The most frequent form of functional relationship is a linear combination of measurements, [4]. |
| y = (c1.x1 + c2.x2 + ...... + cn.xn ) (1) |
| The general relationship between the uncertainty u(y) of a value y and the uncertainty of the independent parameters x1, x2, ...xn is |
 |
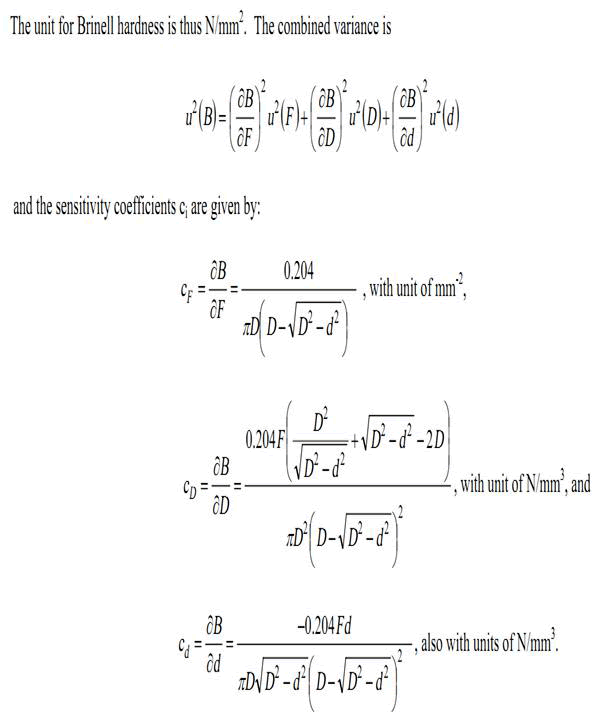
| where y(x1,x2,..) is a function of several parameters x1,x2,.., and ci is a sensitivity coefficient evaluated as ci= y/ xi, the partial differential of y with respect to xi. Each variable's contribution is just the associated uncertainty expressed as uncertainty multiplied by the relevant sensitivity coefficient. These sensitivity coefficients describe how the value of y varies with changes in the parameters x1, x2 etc[5]. |
| NOTE: Sensitivity coefficients may also be evaluated directly by experiment; this is particularly valuable where no reliable mathematical description of the relationship exists. |
| When variables are not independent, the relationship is more complex[6]: |
 |
| The following section expresses two different examples. These examples compare the uncertainty budget for each case, once by using sensitivity coefficients obtained through partial derivatives of the mesurand and the other by using sensitivity coefficients equal one to all factors using the parameter xi as percentages. |
III. EXAMPLES |
| ASTM E10[7] equation 1 defines Brinell hardness (designated as B for the purposes of this example) as a function of the test force (F, measured in newtons), the diameter of the indenter (D, measured in mm), and the mean diameter of the indentation (d, measured in mm): |
 |
| The results of Brinell hardness HB250/5 test are as follows: |
| 251 HB – 250HB – 247HB – 249HB – 253HB. |
| d=1.12 mm |
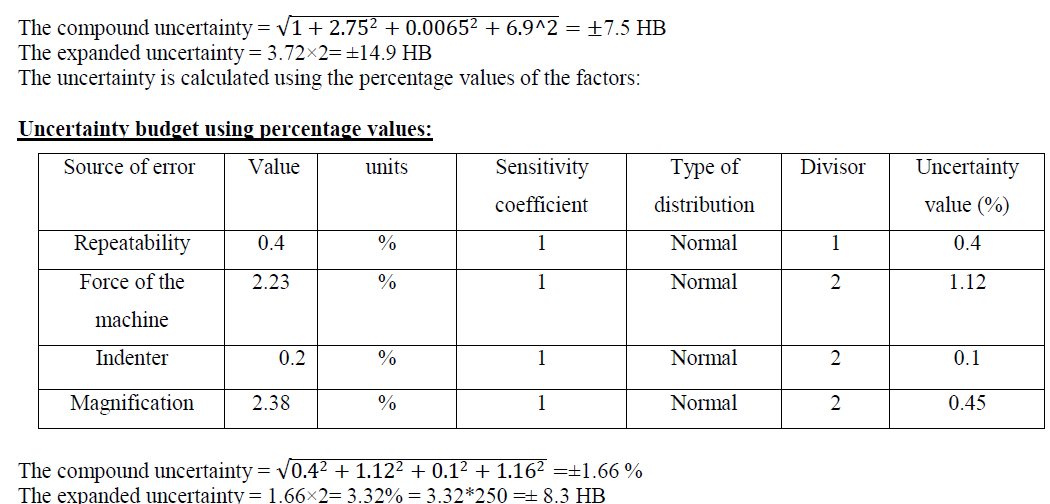
| The expanded uncertainty of the machine for force calibration is± 2.23% i.e ±55 N |
| The expanded uncertainty of indenter due to error in the diameter is ±0.01 mm i.e ±0.2% |
| The uncertainty in the magnification system is ±0.03 mm i.e ± 2.38% |
| From the equations (5) CF = 0.1 mm-2 |
| From the equations (6) CD = 1.31 N/mm3 |
| From the equations (7) Cd = -461.35 N/mm3 |
 |
 |
| This example shows that the using xi as a percentage with using each accompanying sensitivity coefficient equal one give expanded uncertainty of the mesurand about one half of the reasonable value |
IV. DISCUSSION |
| From the previous examples it was shown that: |
| A- Hardness test example: |
| The expanded uncertainty calculated by using sensitivity coefficient from partial derivatives = ±14.9 HB and from using percentage values = ±8.3 HB, the difference is equal to 6.6 HB ≈ 44%. |
| B-Tensile test example: |
| The uncertainty calculated by using sensitivity coefficient from partial derivatives = 7 Mpa and from using percentage values = 59.2 HB, which is about sixteen times the value obtained from using sensitivity coefficient |
| From the above results it is recommended that the uncertainty must calculated using partial derivatives of the equation which relates the output mesurand to the input factors, to determine the sensitivity coefficient for each factor |
References |
|